YaTQA Screenshots & Manual
Note: This page is only available in English right now.
This page is currently under contruction. It is updated to include much more text so it can be used as the users’ manual.
Note: YaTQA uses your local settings for decimal numbers. Images on this page were created using a German version of Windows 7, and therefore display the German locale settings (1.337,42 instead of the English 1,337.42).
Note: These screenshots have been taken from my personal TS3 instance which is used by some hundred users. I’m sorry if you find any of their names and images offending. Feel free to let me know if you do.
Contents
Finished chapters are linked. Italic chapters are about the former Pro version.
* = this window is also used by other features
Home Screenshot applies to: v3.0-gamma to v3.0b
Description applies to: v2.0 and up
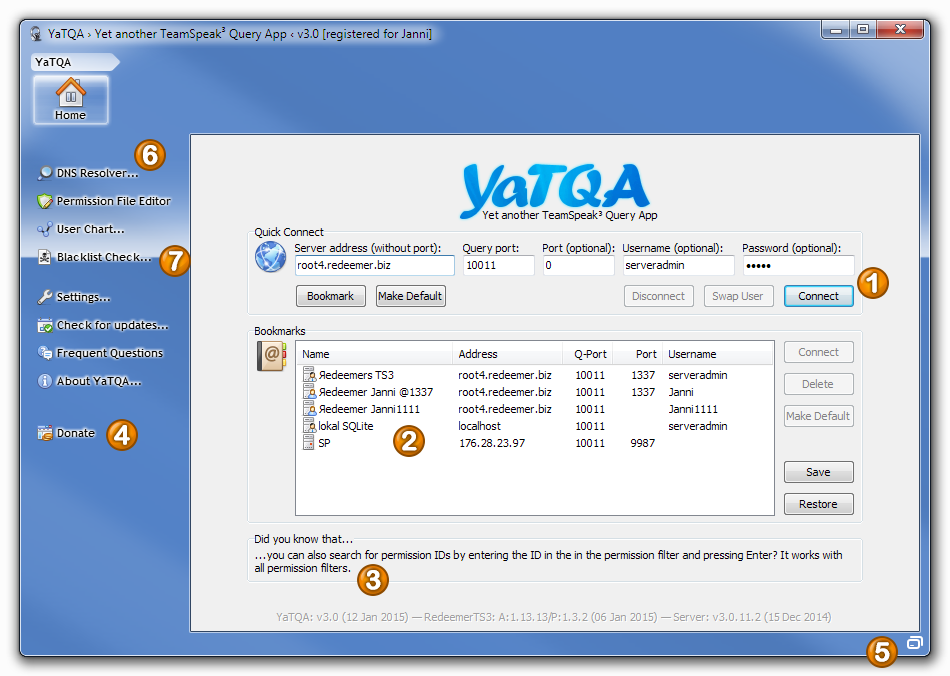
The Home tab allows you to log in. You can also log in using bookmarks.
- Quick Connect: Enter an IP address or DNS, Query Port as well as some optional credentials and default voice port (port 0 makes YaTQA start on server list tab instead of instance statistics tab). If using a DNS instead of an IP address, please note that this tab only supports basic DNS lookups via A and CNAME records. Therefore, if your server is using SRV and/or TSDNS, please connect to the server with your TeamSpeak 3 client and copy the server IP from your own server connection info. See the FAQ on how to get your credentials.
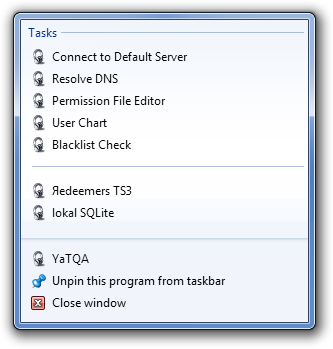
- Bookmarks: You can add a server to your bookmarks by entering the info in the Quick Connect input boxes and click the Bookmark button. The icon of the bookmark shows your user status: If you are server admin, it shows a man with a tie, other users are depicted by a man in a blue shirt, and anonymous bookmarks only have the server. Bookmarks can be reordered by drag and drop, and can be edited by right-clicking. In the application settings, you will find a feature to pin bookmarks and the sidebar items 6–9 to your Windows 7 jump lists, so they appear in the start menu (if pinned to it) as well as the task bar’s context menu (if pinned or running).
- Did you know, that...: This box displays random hints on features that are less obvious or harder to find. Click to read another one.
- Donate: Donations are accepted by PayPal and are giving you bonus features. See the info page for details. For example, only the registered version has a resizable main window.
- Console (PRO): Another one of those features is the console, explained a little later. If you think GUI is for noobs, feel free to use this. It’s guaranteed better than using telnet.
- Sidebar: On the left, you will find some helpful tools. All of them can also be run stand-alone. See the FAQ for details. These features are described below, too.
- Blacklist Check: This is a small feature which doesn’t need its own screenshot. It displays an input box and then just checks the official blacklist for any IP, like the official client does it. The result is displayed in a message window. Like the login tab itself, it only supports A and CNAME records if you enter a DNS. However, it does support your
hostsfile. For confirmation, the resolved IP is displayed in the resulting message box.
DNS Resolver Screenshot applies to: v3.0-rc1 to v3.5-rc2
Description applies to: v3.1c and up
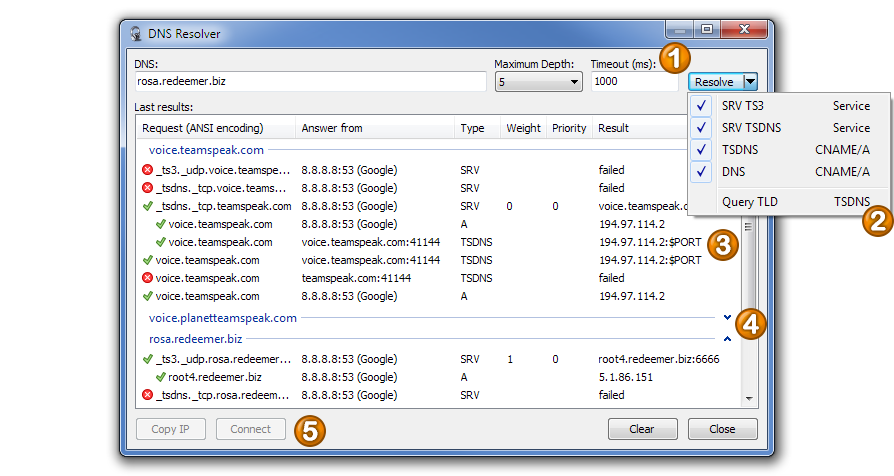
The DNS Resolver simulates the lookup steps done by TeamSpeak and displays them visually, so you can see what fails. It uses Google’s DNS servers for people who have DNS servers that have high TTL or problems with SRV records. So if TeamSpeak doesn’t resolve a DNS, feel free to try with YaTQA. Even if stuff works, it might be interesting to use YaTQA, e.g. you will find out that the hoster TypeFrag violates the standards and uses an invalid DNS configuration, so you are not even supposed to be able to connect to any of their servers (if you can, that’s because your DNS servers to not behave according to the standards either).
- Input: Enter a DNS here. You can also set a maximum depth (to prevent infinite loops) and the maximum time allowed until a TSDNS lookup will time out. The timeout setting affects TSDNS only.
- Advanced Options (Windows Vista+): You can disable some of the lookups if you don’t need them. The last option is for enabling the lookup of top-level domains, e.g.
com,biz,deand so on. Because this feature uses Google’s DNS for lookups, it won’t find computers in your local network (whose names are usually top-level, too) anyway, so there is little use for this feature. It more for those of you that don’t know thatlocalhostresolves into127.0.0.1. ;) - Results: Basically, the TeamSpeak 3 client uses the first successful un-indented (base level) lookup’s result, no matter if indented items fail (causing the client to fail, too).
- Success: This means that YaTQA was able to resolve the DNS and that YaTQA thinks that the result makes sense.
- Warning: YaTQA uses this to highlight DNS configuration that violates the following standards: If your server works anyway, it’s a bug, as the software involved ignores the standards.
- Fail: The lookup failed. If all base level lookups fail, TeamSpeak won’t be able to resolve an address. If the first successful base lookup’s consecutive (indented) lookups fail, TeamSpeak won’t be able to connect.
- Empty results: Empty results are displayed as error, but don’t really belong to any of the above types. Empty results are merely random (if you click Resolve again, they are often gone) and don’t mean anything else but a fail (see above).
- Foldable Groups (Windows Vista+): Lookups can be folded to not scroll too much. YaTQA will automatically collapse older lookups when new ones are added.
- Connect: This copies a resolved IP to the main window in the background.
Permission File Editor Screenshot applies to: v1.4 and up
Description applies to: v1.4 and up

Here you can edit permissions files created by the Permissions tab’s export feature. You can also create new files from scratch. Permission files can be imported to a server with a big number of merging options in the Permissions tab. You can also use them for the Permission Comparison feature.
- Permissions: Green checks indicate that a permission is set by the file. The check can be toggled by double-clicking or pressing Ins/Del.
- Editing permissions: The last four menu items are used to set the values saved in the file. You can also double-click the item in the corresponding column.
User Chart Screenshot applies to: v3.4 and up
Description applies to: v3.3 and up

The User Chart feature uses PlanetTeamSpeak’s REST API to show activity on your server over the last up to 31 days. It is based on the weblist, so your server must be weblisted for at least 15–30 minutes for this to work. The longer your server is weblisted, the more data is displayed. If a server is offline for 2 days, all stored information is deleted. This feature only supports CNAME and A records for DNS lookups. Lookups are done on server side, so a hosts file won’t work here. The chart can be saved as a PNG image by pressing Ctrl+S. Make sure you resize the window to the desired size of the output image.
- Basic Info: The User Chart can be displayed for both, instances and virtual servers. If you do not enter a port, the instance stats are displayed by summing up all known virtual servers’ data.
- Legend: There are two graphs: One for the actual number of users and one for the 24h average.
- Timeouts: A red line means timeout (not available for the 24h average). A purple line shows the transition between a running server and a timeout. Please note that this is by far not perfect: First, Planet TeamSpeak might be subject to DDoS, so don’t start flaming your hoster instantly if you notice a timeout in the chart. Second (and as a result of that), up to 2 consecutive timeouts are ignored and interpolated. As the REST API polls the weblist every 15 minutes, downtimes of up to 15–45 minutes might simply be ignored.
- Days: Saturdays are gray, sundays are red.
- Duration: You can choose different timeframes from 1 day to 1 month. They always start at 0:00 UTC if the server was running at that point (the duration in the combobox is rounded up). You need a registration at PlanetTeamspeak and have to claim your server there to make Planet TeamSpeak keep the stats for more than today and yesterday.
Client’s Server Data Screenshot applies to: some development snapshot between 3.4c and 3.5-pre
Description applies to: some development snapshot between 3.4c and 3.5-pre
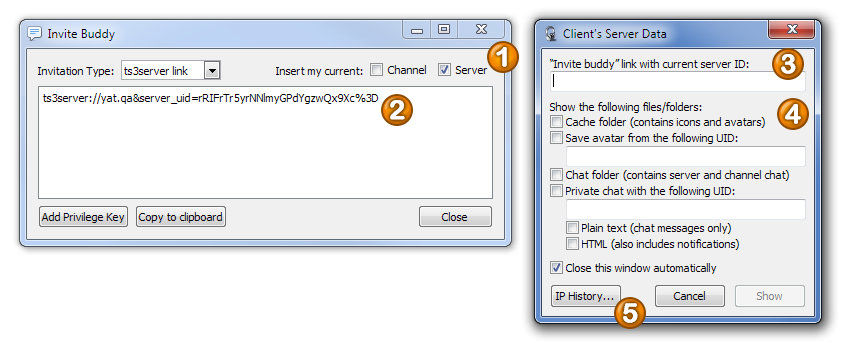
This feature is for finding stuff in your TeamSpeak 3 configuration folder and is meant to be used with servers you don’t have query access for. Many folder and file names are encoded and YaTQA will help you find the folder you need.
- Invite Buddy: All features in this window, except for the IP History explained later on, require the server UID. The only way to get it without query access is by creating a buddy link with this checkbox checked.
- Output Link: This is your link, copy it from here (Ctrl+C) to...
- Input Link: ...here (Ctrl+V).
- Settings: Select what you want to know.
- Cache folder (contains icons and avatars): Opens the folder that contains the cached icons and avatars of the server. Note that these files don’t have extensions which will confuse nearly all image viewer software around there. However, XnView works for viewing these folders (note that the thumbnails don’t work because of the lack of extensions, but preview and opening these files does). You can still use YaTQA and TeamSpeak to upload these icons on your server, even without extensions. Simply enter
*.*in the file selection prompt to see files without extension. - Save avatar from the following UID: If you have the UID, YaTQA will help you with finding the correct file extension for that avatar. After the avatar has been saved, it is automatically opened for your convenience.
- Chat folder (contains server and channel chat): This shows a folder that contains the chatlog for channel and server chat in two formats each. As explained below in the window as well, the simple text file only contais chat messages, while the HTML one also contains some status notification and stuff.
- Private chat with the following UID: Shows the private chat with the given UID. Note that
serveradminis a valid UID here (but not for the avatar, becauseserveradmincan’t have an avatar).
- Cache folder (contains icons and avatars): Opens the folder that contains the cached icons and avatars of the server. Note that these files don’t have extensions which will confuse nearly all image viewer software around there. However, XnView works for viewing these folders (note that the thumbnails don’t work because of the lack of extensions, but preview and opening these files does). You can still use YaTQA and TeamSpeak to upload these icons on your server, even without extensions. Simply enter
- IP History (v3.5+ [UPCOMING VERSION]): This feature has nothing to do with any of the other stuff in this window. It shows the last IPs your client connected to, taken from its log files. After clicking the button, you are prompted to enter a timeframe (4 weeks by default) and if you want to show duplicates as well. As with the console result window, YaTQA will become quite slow if there are some thousand IPs to be listed, so it is strongly advised to enable skipping the duplicates if listing more than a month or so, especially as failed reconnect attempts will be listed as well. After that, YaTQA displays all the connections that have successfully been resolved. The log files do not include the port you entered but only the one that was used by the client, that’s why it says “assumed” in the column header, because TSDNS can and SRV RR will override a port given by the user. Doubleclicking any line in the list will connect to the server (if the
ts3serverprotocol is registered).
Settings Screenshot applies to: —
Description applies to: v3.3 and up
This chapter explains some basic settings. Restarts always mean restarting the application.
Application Settings
- Improved XP Unicode display
- Changes the font of YaTQA to Arial Unicode MS, 7pt instead of Tahoma, 8pt. This improves compatibility with symbols and characters from non-alphabet scripts (e.g. CJK), because Tahoma does not have these included. However, the font size is a little smaller so it still fits the places it is supposed to. Windows Vista and newer automatically fall back to another font for single characters that are missing in the current font, so this feature is useless there.
- Refresh displayed data on tab change
- Use local time (instead of coordinated time)
- As the name implies, this causes YaTQA to use local time instead of UTC everywhere, except for TS3 and YaTQA version build numbers (because the TS3 client also doesn’t use them). This feature will not break sorting features in areas with daylight saving time, so 02B:13 will still be later than 02A:37 (the letters A and B are not displayed).
- Improved channel dropdown lists (not for XP)
- For some lists that only use indents to display sub channels, this adds tree view lines. Despite the description, it can be used on XP with Improved XP Unicode display enabled.
- Minimize to tray
- Always show tray icon
- Enable icon caching (restart required)
- Saves all icons known by the program in a file (called
icons.res). It is recommended to enable this feature. - Don’t use icons globally (restart recommended)
- Icon filenames are supposed to be determined by the CRC32 hash function. Because of the way a hash function works, there might be so called collisions, meaning that two different files have the same hash. If filesize also matches, YaTQA might use an incorrect icon from the cache. This is extremely unlikely, but here’s the option for it, just in case.
- Try using Windows Aero (restart required)
- Uses Windows Aero when available. This option is enabled by default on Windows Vista and Windows 7. On all other operating systems, it is disabled by default. This setting has no effect when running on XP.
- Disable Aero glow (restart recommeneded)
- Disables the white shadow behind menu bar texts. Some people found them annoying. Has no effect unless Try using Windows Aero is enabled.
- Search for updates on start
- Does the same thing as the update checker feature in the menu bar, but the result is displayed in the status bar and only if something was found.
- Save sort settings (restart recommended)
- Enable jump lists (Windows 7 and up)
- Adds some menu items to the task bar and start menu item of YaTQA that allow faster access to your bookmarks and the stand-alone features of the menu bar:
Compatibility
You can set a delay between two commands so you don’t get banned on servers with a low flood tolerance. 340 is a good value to not get banned with the default server settings.
Starting with 3.5 (final), this setting is for non-serveradmin accounts and non-SSH connections only. serveradmin accounts will be prompted to increase flood settings. SSH accounts are logging in from 127.0.0.1 and will usually be whitelisted.
Virtual Servers
Allows setting a default name and phonetic name. Default is “username from IP:Port”. Some people found reveiling their IP dangerous, so this option was added. The SSH feature (see below) will also hide your IP address.
Hints
- Hint for low “commands to flood”
- Should be disabled if you are on your servers’
query_ip_whitelist.txt. - Hint for improved group selection features
- When changing the template and query group settings of your instance, this will hint you that you can join a virtual server to get a group list. The TS3 server does not provide a group list if you are not connected to a virtual server, so you would have to enter the ID instead of selecting one from a list.
- Try to look up names of failed permissions
- In many cases, you won’t have the permissions for this, but give it a try.
- Allow connecting to a non-default query port
- Many people claimed YaTQA wouldn’t work at all, because they entered their voice port in the input box saying query port. Without this option enabled, you can only connect to port 10011, which is the default port.
- Allow deleting important groups
- Allows deleting the first 5 servers groups and first 4 channel groups. Activating this will void any support request!
- Allow leaving important groups
- Allows
serveradminto leave Admin Server Query. Activating this will void any support request! - Allow changing the machine ID
- Many people found it funny to add stuff to the machine ID label and found their servers inaccessible, so this feature was locked.
- Flash when a lenghty operation finishes
- Makes YaTQA’s task bar entry flash (usually orange) if an operation finishes that displays a progress in the status bar.
Save the Main Window’s...
- Position
- Size
- Pro version only.
- Maximized
- Pro version only.
Wine/Linux Mode (restart recommended)
If enabled, YaTQA automatically detects Wine by the existance of HKCU\Software\Wine. If that key exists, some fixes are applied. If you have – for some reason – that registry key or just want to skip the check, disable this feature.
Pie Charts Style
Choose from 4 different styles for the pie charts. These have been selected from a larger number of styles by a voting with some users.
Browse
Shows the configuration folder YaTQA is currently using. This is either the installation folder (if yatqa.ini is present there) or %APPDATA%\YaTQA.
SSH
Allows you to set up SSH tunnel profiles. Whenever you attempt to connect to a server with the same address and have this feature enabled, YaTQA will check if you have an SSH profile with the same address and use the tunnel if this is the case.
Despite being considered a YaTQA Pro feature, you can still use it in the free version to test if your server is supported. If this is the case, the Test button of the profile editor will display your server version.
Global Hotkeys Screenshot applies to: —
Description applies to: v3.9.2 and up
This is a list of custom hotkeys that can be used throughout the program. You can of course still use Windows’ default hotkeys in input boxes.
- Ctrl+F
- Filter if applicable (permissions, log), if not applicable, it equals Ctrl+Alt+F
- Ctrl+Alt+F
- Find (in lists)
- F3
- Find next (in lists and tree views)
- Ctrl+A
- Select all (in input boxes as well as in lists, if you are not renaming an item)
- Ctrl+C
- Copy or save selected data (in lists, if you are not renaming an item)
- Ctrl+Alt+A
- Auto adjust columns (in lists)
- F2
- Rename (in lists)
- F5
- Refresh tab (main window only)
- NUM +
- Check selected checkbox list items
- NUM −
- Uncheck selected checkbox list items
- Toggle selected checkbox list items
Console (PRO)
The console is available to all users of the Pro version by clicking the white button on the bottom right (see Home #5) of the main window after connecting to a server.
Console Screenshot applies to: v3.4 and up
Description applies to: v3.4 and up
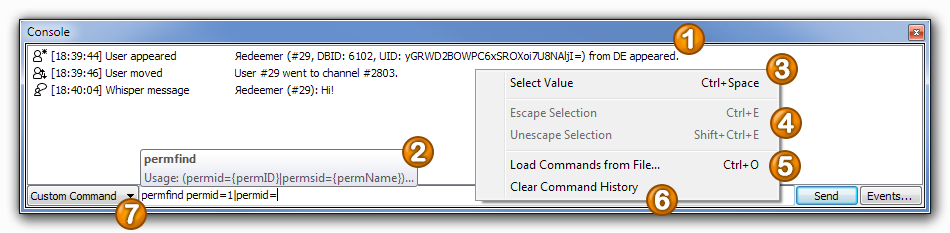
The console’s main window displays subscribed events and allows you to chat and send commands.
- Console Area: This list displays all events and command results. Even with no events enabled, the server sends events for sent text messages, which are then displayed here. You can subscribe to other events by clicking the Events... button on the bottom right. Doubleclick a line to display all data that was sent from the server.
- Auto-complete: If you start typing a command, auto-complete will first help you choose your command by listing all matching commands as you type. This includes undocumented commands, too. After deciding for a command, its parameters are displayed (see below for details). The syntax often doesn’t match the official syntax, as it is based on years of extensive research when creating YaTQA. If you prefer the official syntax or want the help text, just hit F1.
- Select Value:
clientinfo clid=... what was theclidof that user again? Just hit Ctrl+Space for a list to select a value from. This works with pretty much every parameter, except for those that are ambiguous or have their possible values explained in the syntax help (see 2). If YaTQA doesn’t know a parameter, it displays an empty text box which is escaped when clicking OK or pressing Enter. - Escape: Escape all that escaping by selecting text and pressing Ctrl+E. This can of course be undone, too. Just don’t do the latter with multi-line text.
- Load Commands from File: Loads a macro file with commands. These files (usually having the
.txtextension) can be created with a simple text editor and are best placed in theMacrosfolder of your YaTQA configuration folder. After opening such file, you can edit it before it will be executed, allowing small adjustments to IDs, names and stuff like that. - Clear Command History: Like in nearly all consoles, YaTQA’s console too allows you to recall previous commands by pressing ↑ and ↓. If you find there’s too much stuff in that history, you can clear it with this feature (or delete
commandhistory.txtin your configuration folder). - Target: The console is not only for sending commands, but also for chatting. You can select the target mode here (command, global/server/channel/private message). If you are entering a chat message, you can use WYSIWYG. Right-click the input box for formatting options.
Parameter Help Syntax by Examples Screenshot applies to: —
Description applies to: v2.0 and up
([sid=]{serverID}|port={serverPort})- You must choose exactly one of the parameters in normal brackets to make the command work.
sid={serverID}- Curly brackets indicate values that you should replace.
type={0:template|1:regular|2:query}- For enumerations, colons separate values from their meaning. In this example,
0means template group. [([sid=]{serverID}|port={serverPort}) [-virtual]]- Square brackets usually show you optional things.
-virtualis called an optional switch, usually giving you more output, but in this case, it changes how the function works. [client_properties]...- In this case, square brackets indicate that there are a lot of possible properties which couldn’t be listed here. Properties are to be separated by spaces.
permsid={permName}...- If not used after square brackets, ellipses show you that the previous term can be used multiple times, separated by a pipe (
|). This is called an array. clientftfid={0-65535}- This parameter may range from 0 to 65535 (this range is called a word in programming).
Results Screenshot applies to: v3.0-gamma4 and up
Description applies to: v3.0-gamma4 and up
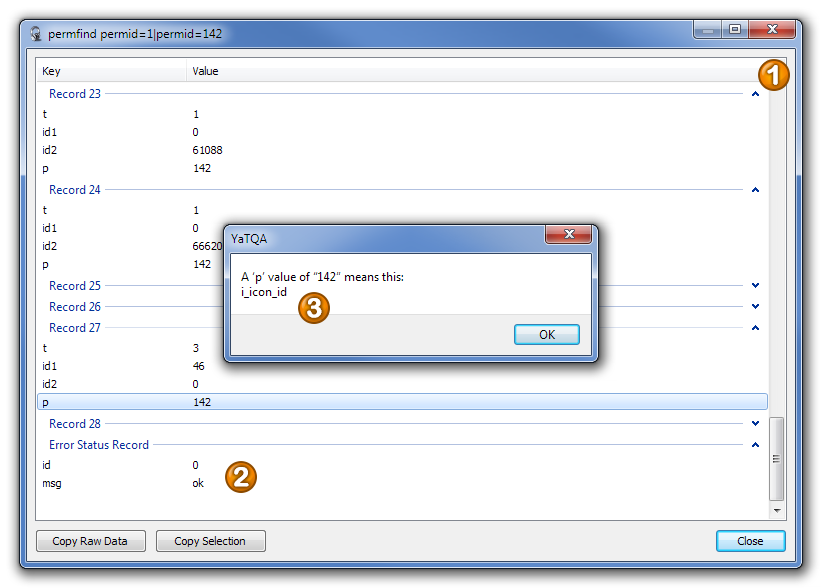
This window displays the results of commands and details for events.
- Records (not on Wine): Records (datasets) are grouped (can be disabled for results with hundreds of records, as it will slow down this window).
- Error: The last record is the error record.
- What’s This Value?: If you don’t know what a value means, double-click it to find out! Works with all idents except for ambiguous and default-type (integer, boolean, string) ones.
Instance Tabs
Most features of the instance tabs only work if you have the global query account named “serveradmin”. Virtual server tabs usually work with accounts created in TeamSpeak.
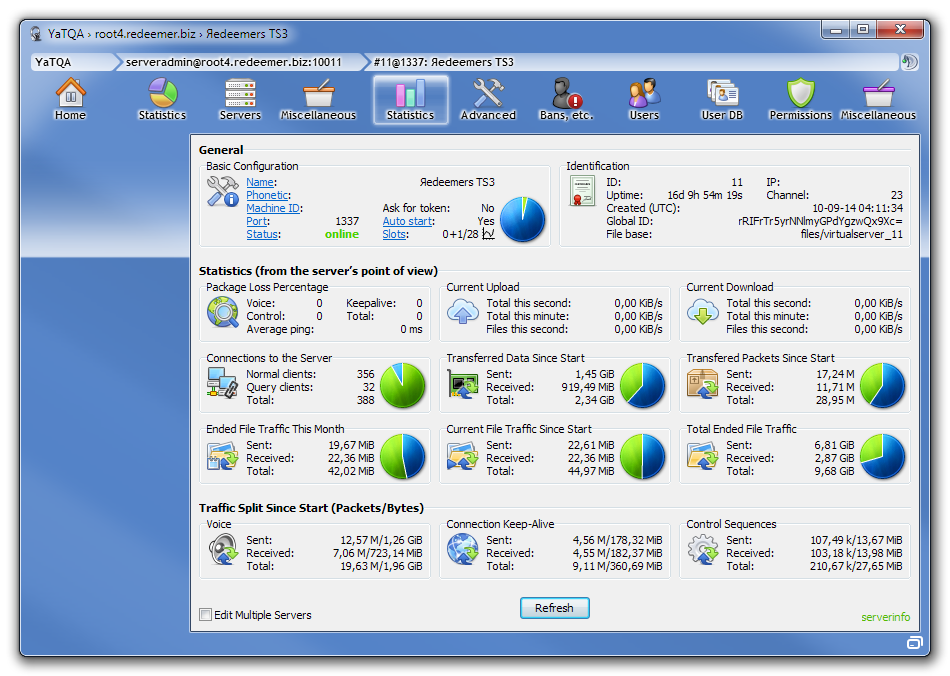
Statistics
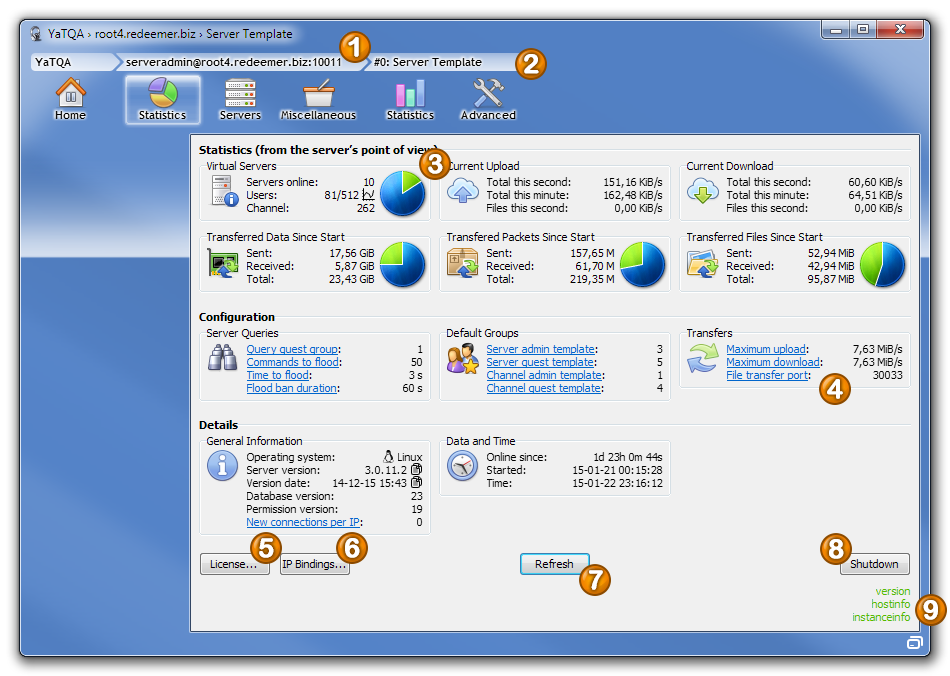
This tab displays the instance stats and has some general instance features.
- Instance: The top bar of YaTQA has three sections. This is the second, which is about the instance features, and it includes three tabs.
- Virtual server: There are seven tabs for the virtual server selected on the Servers tab. By default, you can edit the server template which contains the settings for new servers. The other tabs five tabs are not available to the server template.
- Stats and charts: Here you can find some instance statistics. Pie charts are always green and blue. Green means used slots or traffic uploaded by the server, green is for unused slots or downstream traffic.
- Links: Click the link to change the property it represents. Boolean (yes/no) properties are instantly switched, all others will display an input window. Depending on the property, you can enter numbers, texts and select a value from a list.
- License: Displays the licensing information at log start. Normally, this is equal to the server start, but can be modified with the
logappendswitch (see server quickstart manual). If a license has been renewed during runtime, this text will not be update. - IP Bindings: This is for colocated servers. It displays the IPs served by this instance. Even if bound to only a certain IP, normal servers will just display 0.0.0.0 here.
- Refresh: Most refresh buttons (those of information that can change without
serveradminbeing involved) pop up a menu that lets you set a timer for automatic refresh. - Shutdown: Ends the server process. Unless you have a watcher script, you must restart the server via SSH. This is one of the preferred methods of killing a TeamSpeak server if you have a license that would otherwise be unavailable for some hours.
- Status: These status texts replace error messages in tabs where they would be too annoying. Red text means that a command failed, black text means that the command is currently being processed and green means success. However these status texts to see the required permission.
Servers Screenshot applies to: v3.0-gamma5 to v3.1c
Description applies to: v3.0-gamma5 to v3.1c

This tab lists all your virtual servers. By doubleclicking, you get a lot more tabs with more features.
- Server List: Lists all servers. The free version is limited to 13 entries in this list. You can use the list to rename servers or use the buttons on the right. Usually, you will just want to double-click a server here.
- Server Counter: Here you can find the number of servers (displayed as online+offline servers), autostarting servers, slots and autostarting slots. The latter number is omitted if it cannot be determined if some autostarting servers are not currently running (meaning that TeamSpeak doesn’t provide their slot count). The number of online users can be found in the Statistics tab.
- Create New Server: This create a new server. You may leave any of the boxes blank, causing the respective data (and all settings that have no input box) to be copied from your server template. The server template is the default “server” (even though it is not server) when joining an instance with YaTQA. You can switch to your server template by clicking the Leave button in this tab.
- Local Server Note: Click in the sticky note to enter some text about the selected server. Because there is no way to store this on the TeamSpeak server, it will be saved on your hard disk, hence the name local server note.
- User Chart: Directly takes you to the user chart of the selected server.
- Local Files: If you have been running TeamSpeak on your computer, this will take you to the server’s local folder that includes its chat logs and cache. YaTQA also makes use of the latter to display icons and avatars faster. Local folders are usually hard to find as a user because they use the server UID encoded in Base64.
- Leave: This leaves the current virtual server and takes you back to the server template. In the Pro version, this is how you access the ghost mode. Ghost mode causes you to leave a server (and requires you to be on one when you enable it). You can then select any server and do spooky things.
Miscellaneous Screenshot applies to: v3.0b to v3.1c
Description applies to: v3.4 and up
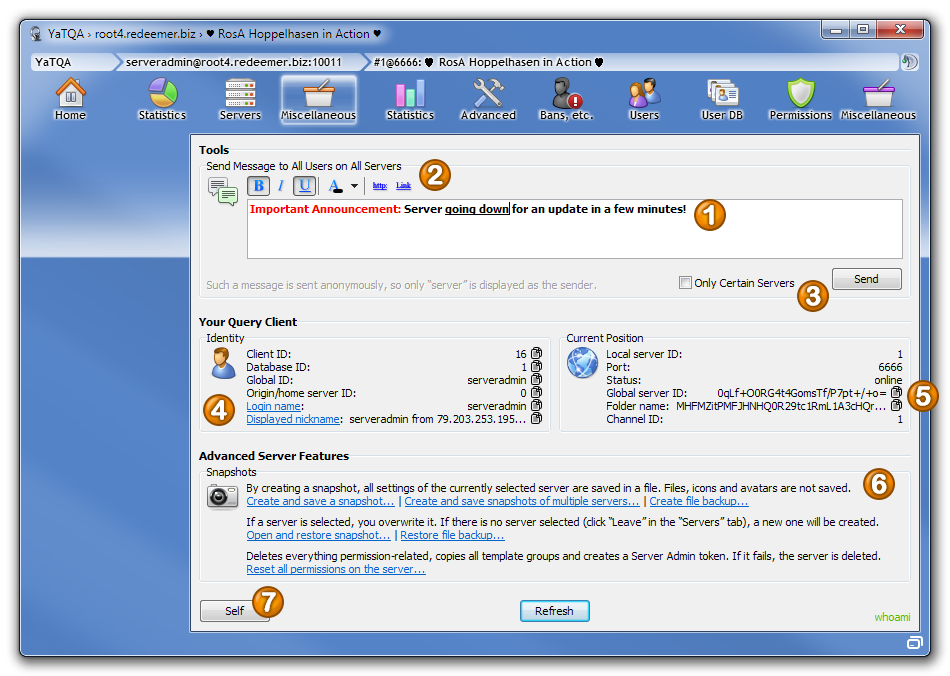
Got something to say? Tell it to all people on all your virtual servers. Like all text boxes, this box has WYSIWYG BBcode support.
Below that, you can change your name and make backups. You can also backup all servers at the same time.
- Global message: Sends an anonymous message to all servers (at least if you don’t have the checkbox checked).
- WYSIWYG editing: There is partial WYSIWYG support in YaTQA. It supports bold, italic, underline, color, alignment (channel descriptions only) and font size (channel descriptions only).
- Note on character limits: On the right end of the toolbar, the character limit is displayed after waiting 300 ms. BBCode tags also count against this limit, which the number displayed there reflects as well. Please note that there are two different measurements for texts in TS: characters and UTF-8, the latter causing so some non-English characters to count twice or trice. There’s a limit for query commands at 9203 bytes (in this case, spaces and some other stuff also count twice), which can be exceeded by channel descriptions with many spaces and offline messages in Asian languages even when inside their normal/official limits displayed in the toolbar.
- Only certain servers: Only sends the message to the servers you select. Those messages are not sent anonymously, but with your query account under the name you set in the settings. See Mass Server Editing for details.
- Identity: You can change your display name here. There is also an option to change your display name each time you connect to a server in the settings. Changing your login name will generate a new password for you, which is copied to your clipboard.
- Location: This box shows where you are. It shows details such as the server UID and the cache folder name, which is generated based on the UID. Copying the cache folder name can help you find the server’s cache on your system if you cannot access the server list’s context menu (see Servers #6).
- Snapshots: Creates and restores snapshots, which contain all settings (except port and virtual server ID). Snapshots do not include files, icons and avatars. YaTQA also offers file backups, which contain files and icons, but still no avatars (because the server software does not allow uploading any avatars other than your own one).
- Create and save snapshot: Creates a single snapshot.
- Create and save multiple snapshots: Displays a list of servers, where you can check which servers you want to take a snapshot of. See Mass Snapshot Creation for more details.
- Create file backup (Pro): Creates a (by default incremental) backup of all files in all folders. Also supports icons, but does not support avatars due to serverside limitations. See Channel File Backup Creation for more details.
- Restore snapshot: Restores a snapshot. If you have a server selected, it will be overwritten. If not, a new server is created. In the latter case, you can also select multiple snapshots at once which will all be restored to new servers.
- Recalculate hash (Pro): This allows you to restore modified snapshots that the server would normally refuse to load.
- Leave keypair unchanged (Pro): This feature keeps the server from restoring the snapshot’s server UID (which is calculated from a hidden property named
virtualserver_keypair) along with the snapshot. Here’s why you might want this: TeamSpeak doesn’t allow mulitple servers with the same UID so you normally cannot make a copy of a server. With this feature, you can. If a server is currently selected, the restored server will still have the same UID. If no server is selected, YaTQA creates a new 1-slot server for each selected snapshot, just to steal its keypair and use it to replace the UID of the snapshot that will instantly be used to overwrite the new server. The keypair is taken from an actual server and not directly changed to a random key because the latter would cause an instance crash.
- Restore file backup (Pro): Restores all files from an backup to corresponding (or user-defined) channels. See Channel File Backup Restore for more details.
- Reset all permissions on the server: Using the permission reset feature will delete all permissions (groups, client and client permissions) and copies all template groups to the server. The key for the Server Admin group is then copied to your clipboard.
- Self: This menu has a bunch of mostly completely useless features. Some of them can be used to troll people, e.g. by enabling the recording status, which will play the sound even for users that cannot see the client.
Mass Snapshot Creation Screenshot applies to: v3.0-gamma and up
Description applies to: v3.0-gamma and up
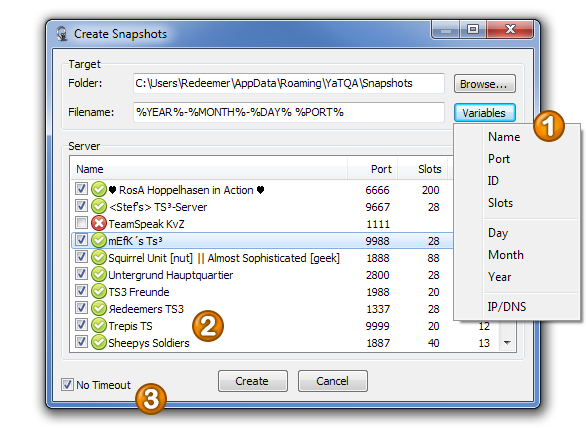
Creates multiple snapshots.
- Filename and variables: You can define a filename pattern with variables.
- Servers: Select the servers you want to back up. It defaults to online servers, but you can change it or right-click the list for a menu with some selection criteria to make YaTQA select what you want. If you select offline servers, your license must allow starting them, even though it only starts them virtually (which requires no slots).
- Timeout: Usually, YaTQA expects an answer (or a part of it at least) from the server within 5 seconds. For very slow servers, this might not be enough and you might want to disable it. If something goes wrong with timeouts disabled, YaTQA will freeze.
Channel File Backup Creation (PRO) Screenshot applies to: v3.0b and up
Description applies to: v3.0b and up
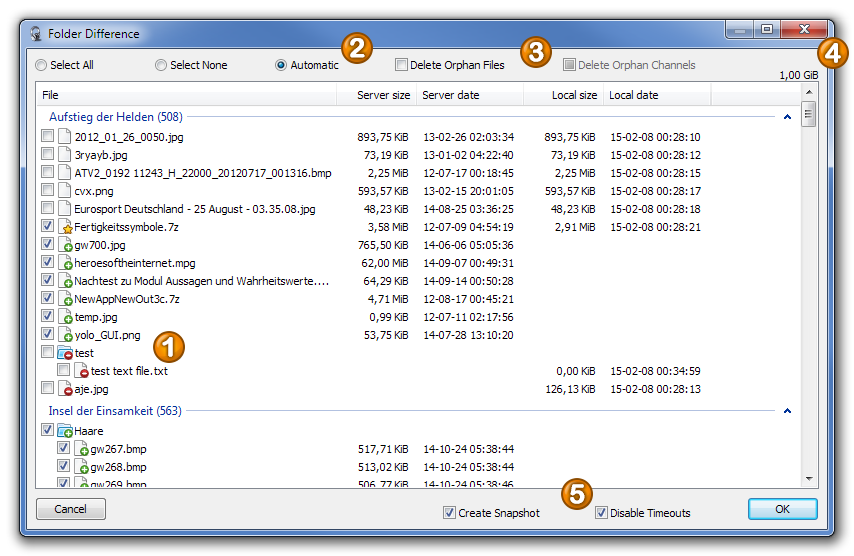
Make the ultimate backup that includes snapshots, files and icons! Sadly, avatars cannot be uploaded due to limitations of the TeamSpeak server software.
- Files: This list contains all files in all channels on your server. It can take some time to generate for deep folder structures and/or a big number of channels. It uses the following states:
- Star: Files that have been updated on the server (folders cannot be updated)
- Green circled plus: File/folder was added on the server
- Red circled minus: File/folder was deleted from the server but you still have a backup
- None: File/folder exists on your computer and your server and (in case of a file) wasn’t updated
- Selection Presets: The Automatic preset selects new and modified files, which are defined as files which have a newer date on the server (which means they got updated), a different size (which means the download failed) and are not 0 bytes on both, your computer and your server.
- Delete Orphans: Files and channels that no longer exist on the server can be deleted from your local backup by checking these boxes.
- Total Size: This is the exact size you will have to download once you click OK. Bear with your mobile internet plan if you use one for this...
- Snapshots: Create a snapshot for the ultimate backup experience. Disabling timeouts increases compatibility with slow and/or large servers but might freeze YaTQA if something else goes wrong.
Channel File Backup Restore (PRO) Screenshot applies to: v3.0b and up
Description applies to: v3.0b and up
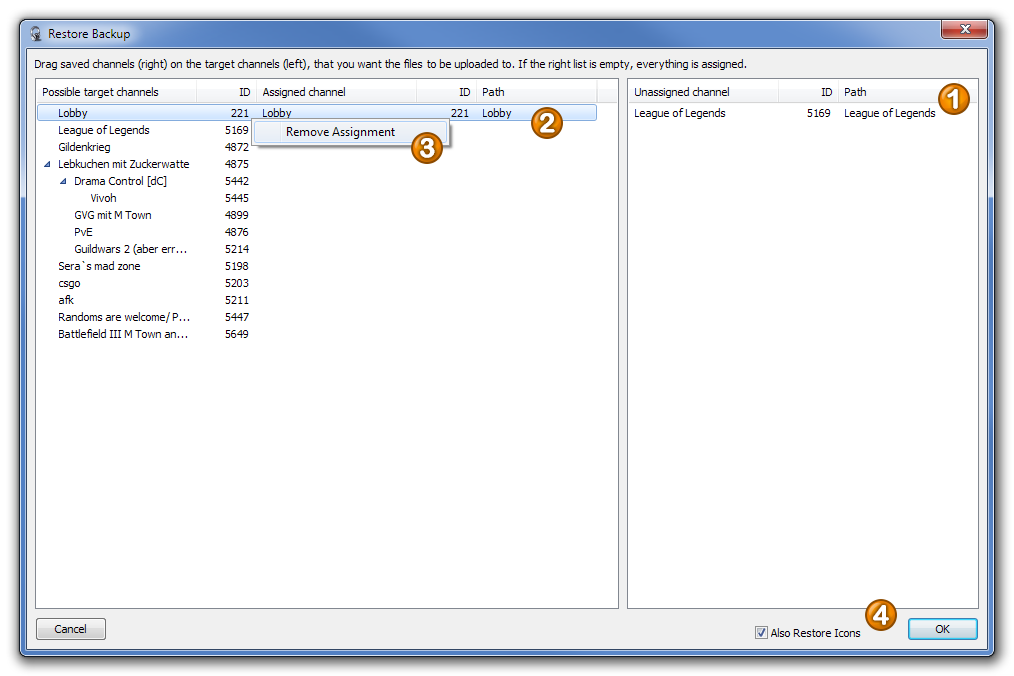
Assign each source channel’s backup to a channel on the server using drag and drop. By default, YaTQA tries to match the channel name paths (channel name paths are channel names that also include the names of all parent channels).
- Source Channels: These are the channels your backup contains. Drag and drop them on the desired target channels. If this list is empty, all channel backups have been assigned.
- Target Channels: These are the channels that currently exist on the selected server. If the last three columns aren’t empty, a source channel has been assigned.
- Delete Assignment: Removes current source channel assignment.
- Restore Icons: Restores icons (only available if you backed them up, if not, you can still use your icon collection later on).
If your backup includes a snapshot, you will be asked if you want to restore it first, so above actions are performed on the restored snapshot. If you have neither selected a server nor deployed a snapshot (which results in selecting a server), this feature will fail.
Virtual Server Tabs
Statistics & Advanced
These are the virtual server statistics. This tab is similar to the instance Statistics. See there for more details.
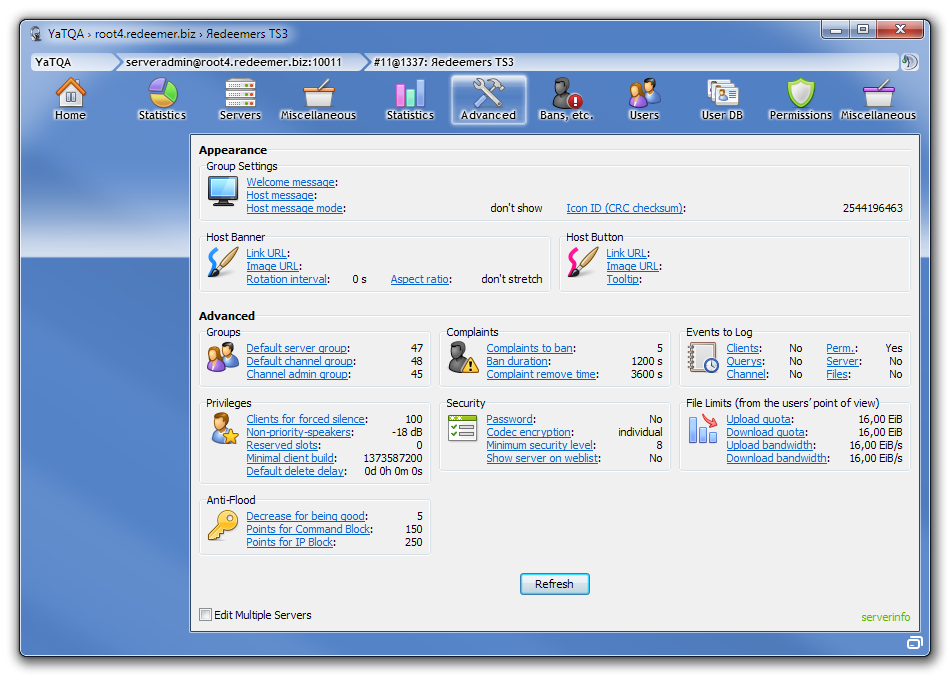
You can find most of these in TeamSpeak, too. Please note that unlike that, YaTQA also allows you to edit your virtual server template. To do this, select no server in the Servers tab or just go to these two tabs before selecting a server after login.
You can use the Edit Mulitple Servers feature in both tabs. For more details, see the section below.
Edit Multiple Servers
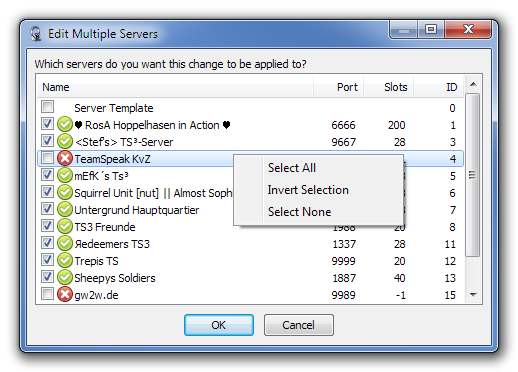
This window is used by the following features:
- Virtual server Statistics and Advanced: These tab use the window to select which server should be edited. Mass server editing is not available if you change the server status.
- Instance Miscelleaneous: If you check the checkbox of this tab’s global message feature, you can select the servers to receive your message. Template server is not available here of course and selecting offline servers doesn’t make sense either.
As you can guess from the missing numbers on the screenshot, usage of this window is straight-forward: Check the servers you want the previously-selected features to affect. You can also use the context menu to select many servers at once. The selection defaults to online servers and changes will be saved until you close YaTQA.
Bans, etc.
Bans
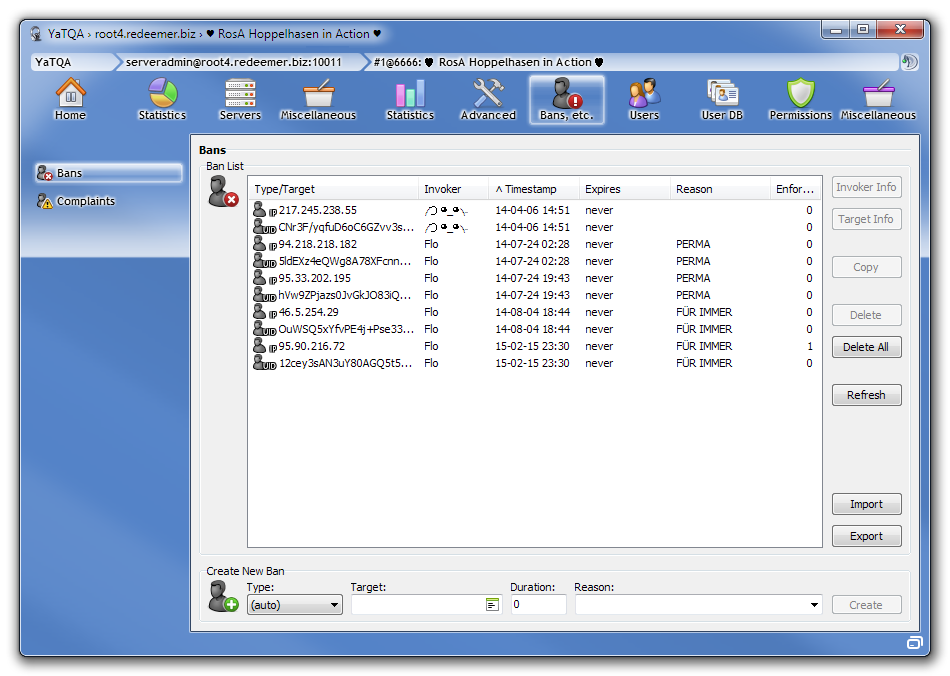
A ban list, similar to that in TeamSpeak.
Complaints
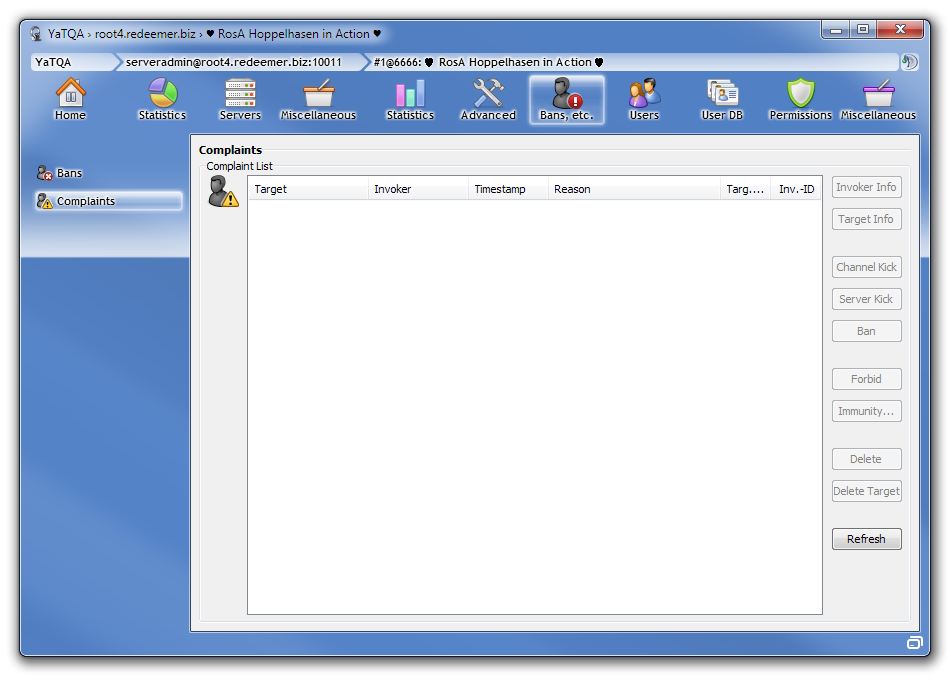
Complaint list.
Users
Server View
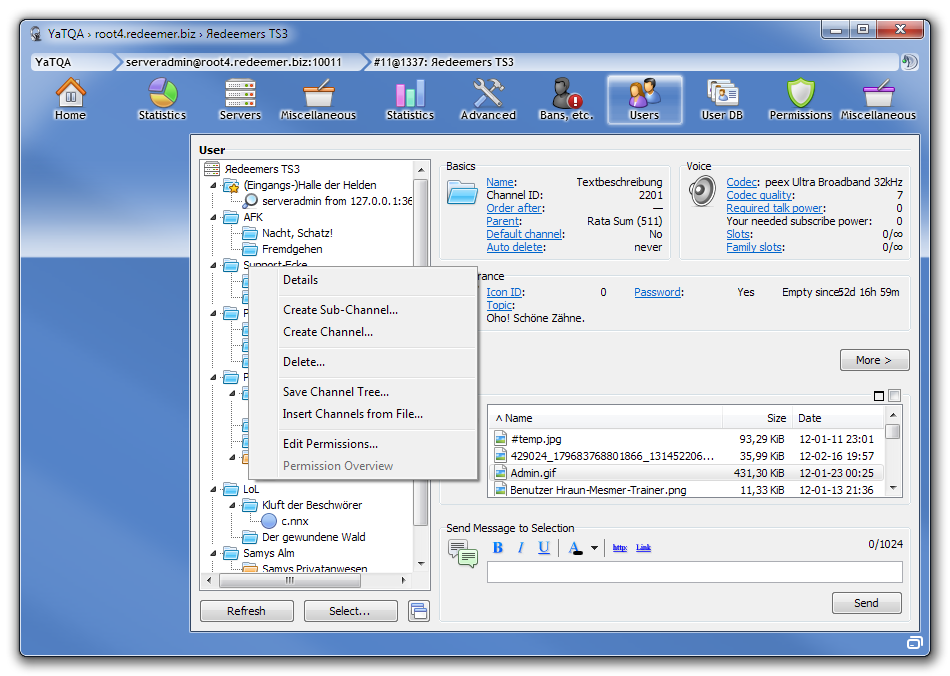
Channel and user tree, along with a file browser. The file browser has a preview feature and allows you to upload and download folder structures (so if TeamSpeak wouldn’t want ASCII characters only, you could upload a backup of your harddisk). Files can be moved between folders AND channels.
Image Preview

Shows an image file. Supported files have a different icon in the file list. YaTQA supports the same file formats as TeamSpeak:
bmp- Windows Bitmap
gif- Graphics Interchange Format (note that animations are a bit slower in YaTQA than in most other software)
jpg,jpeg- Joint Photographic Experts Group
png- Portable Network Graphics (APNG is not supported)
pbm- Portable Bitmap (ASCII and binary)
pgm- Portable Graymap (ASCII and binary)
ppm- Portable Pixmap (ASCII and binary)
xbm- X BitMap
xpm- X PixMap (TeamSpeak supports version 1 only, support for higher verisons was disabled in YaTQA, even though it exists)
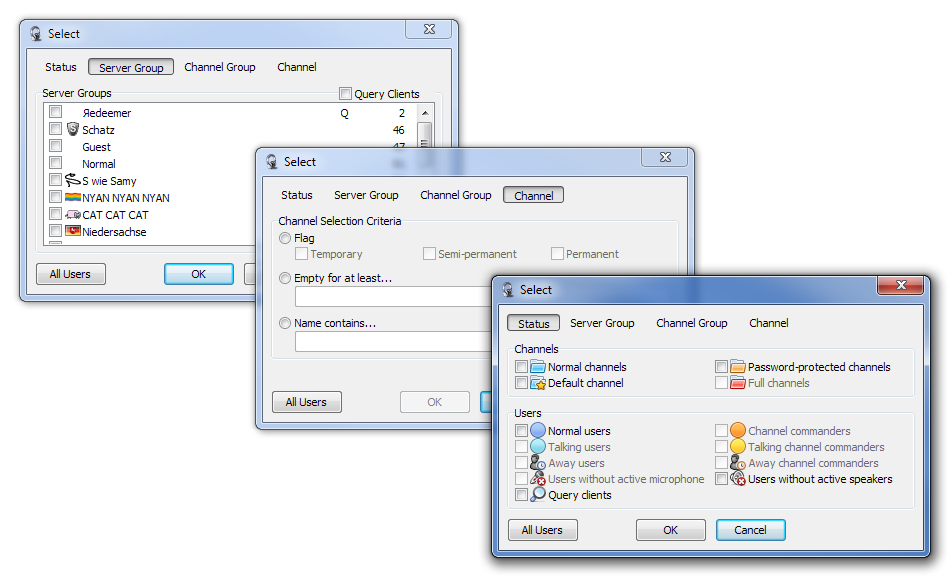
Select Screenshot applies to: v3.0-rc1 and up
Description applies to: v3.0-rc1 and up
Annoyed by guests? Select all guests and kick them right after.
This window has four modes:
- Status: Selects items in the tree view by their icon (status).
- Server/Channel Group: Selects members of the group. The checkbox in the top right allows you to choose whether or not (or both) to select query clients as well.
- Channels: Selects channels by certain criteria.
There is also a button for quickly selecting all users.
As a quick note, you can not only drag and drop users into channels but also move them by rightclicking the target channel while having a selection already. Just choose the only item of the menu that will appear.
Codecs Screenshot applies to: v1.3.3.7c and up
Description applies to: v1.3.3.6b and up
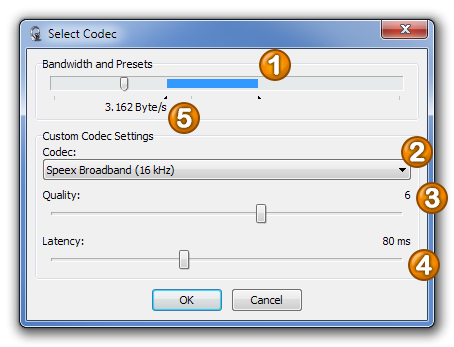
Change the codec.
- Presets: Moving the slider loads the official codec presets.
- Codec: There are six codecs to choose from. In channels using Opus Music, clients will broadcast in stereo if using a computer. In all other cases, TeamSpeak is mono.
- Quality: Choose your quality. Each codec has 11 quality levels (0 to 10), but you might also want to take the latency settings into account when you want to reduce bandwidth (see 4). Please note that some quality levels for CELT and narrowband Speex are the same:
- Speex 8 kHz: 3–4, 5–6, 7–8 each
- CELT 48 kHz: 0–1, 2–4, 5–8 each
- Latency: Set the latency for Speex and CELT. This option has been removed from the official client but is still in effect and incredibly useful to reduce bandwidth, e.g. for clients connected via slow mobile internet connections. As an example, increasing the latency only from 20 to 60 ms will likely go unnoticed but will save 1.5 kByte/s in bitrate. The lower the quality of the codec, the higher the maximum latency you can set. Experiments have shown that this setting does not reduce the bitrate of Opus codecs, so it will be disabled when such codec is selected.
- Estimated Bitrate: This is the bitrate information from the client (taken from an old version). It is not fully correct for Opus codecs, as these are VBR (variable bitrate) and bandwidth will vary depending on input data. For the Opus Voice preset, broadcasting only my background noise used 250 bytes/s less than the official average, whereas speaking and humming used 250 bytes/s more than the stated number. In addition to voice traffic, there is also keep-alive and control traffic, as well as file traffic. Current versions of the client omit the effect of the latency setting in the info pane on the right (it will always asume 20 ms), but it is still in effect nonetheless.
Channel Backup Creation Screenshot applies to: v3.0-rc1 and up
Description applies to: v3.0-gamma5 and up
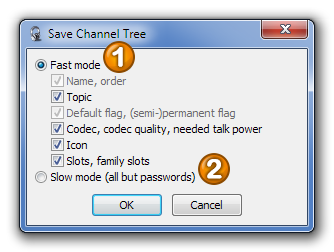
Creates a channel backup file. This file contains no channel permissions and no channel files.
- Fast mode: Fast mode creates the backup with only one
channellistcommand. You can configure the following settings:- Name, order
channel_name, also saveschannel_orderandpidto restore the order and parent channels- Topic (
-topic) channel_topic- Default flag, (semi-)permanent flag (
-flags) channel_flag_default,channel_flag_permanent,channel_flag_semi_permanent- Codec, codec quality, needed talk power (
-voice) channel_codec,channel_codec_quality,channel_needed_talk_power- Icon (
-icon) channel_icon_id- Slots, family slots (
-limits) channel_maxclients,channel_maxfamilyclients
- Slow mode (all but passwords): Slow mode uses one
channelinfoquery per channel to retrieve the maximum information possible. Because passwords are always returned hashed, they cannot be restored.- Permissions
- Saves all channel permissions and therefore uses double the commands for saving the channels (v3.5-pre and up)
Channel Backup Restore Screenshot applies to: v3.0-rc1 and up
Description applies to: v3.0-gamma5 and up
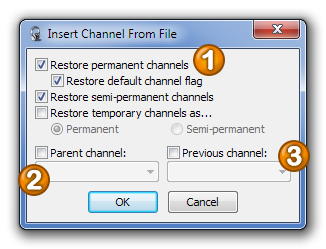
This feature restores a saved channel tree. Keep in mind that this requires one command per channel. Due to a server bug, channels with icons must use two commands to be created.
- Choose flags: Select what type of channels should be restored. You can also restore temporary channels, but need to specify whether to make them permanent or semipermanent, as creating multiple temporary channels would result in just one channel and all others being deleted immediatedly.
- Parent channel: Select a parent channel. All restored channels will be a subchannel (or lower levels where applicable) and so on of it.
- Previous channel: Select a previous channel. If you don’t check this, the imported channel tree is created before the first existing channels. This option will uncheck itself if a parent channel with no children has been selected.
This feature removes the following properties because they cause server problems:
channel_icon_id(setting this withchanneleditcommand causes data loss on server restart due to a server bug; YaTQA will therefore set the icon using the permission system)channel_security_salt(causes 1538 invalid parameter; according to TeamSpeak, this is an SDK feature and is not supposed to exist in the normal server)channel_filepath(causes 1796: currently not possible)channel_flag_password(causes inconsistency)channel_password(returns a hash but is set unhashed, so it cannot be saved)
Mass Permission Editing Screenshot applies to: v3.0-gamma
Description applies to: v3.0-gamma
This window is used to select permissions for use with the following features:
- The Users tab’s context menu feature Edit Permissions: In this case, this window is used to select which permissions you want to change.
- The Permissions tab’s Permission Comparison feature: This window is used to select which permissions you want to compare. In this case, permissions that you are already comparing are highlighted with green checkmarks, all others have grey checkmarks.
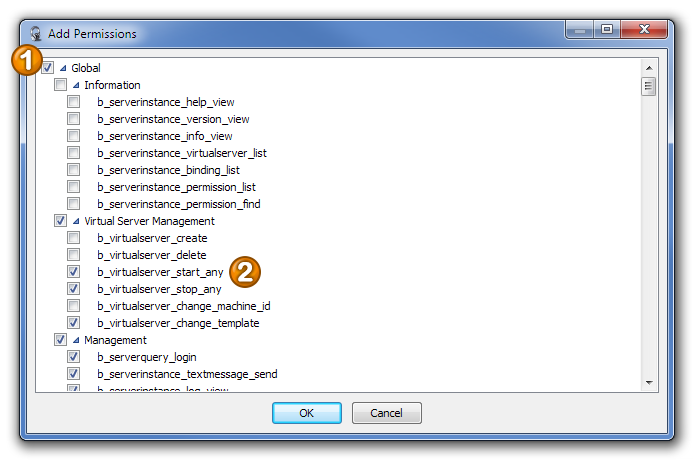
- Clusters: Checking or unchecking a cluster (I use the term for permission groups, as group is already in use) also selects all children.
- Individual permissions: Check which permissions you want the feature to use. As stated above, the Permission Comparison tab highlights it’s current custom permissions (but not the default
power-related ones) with a green checkmark.
User Details
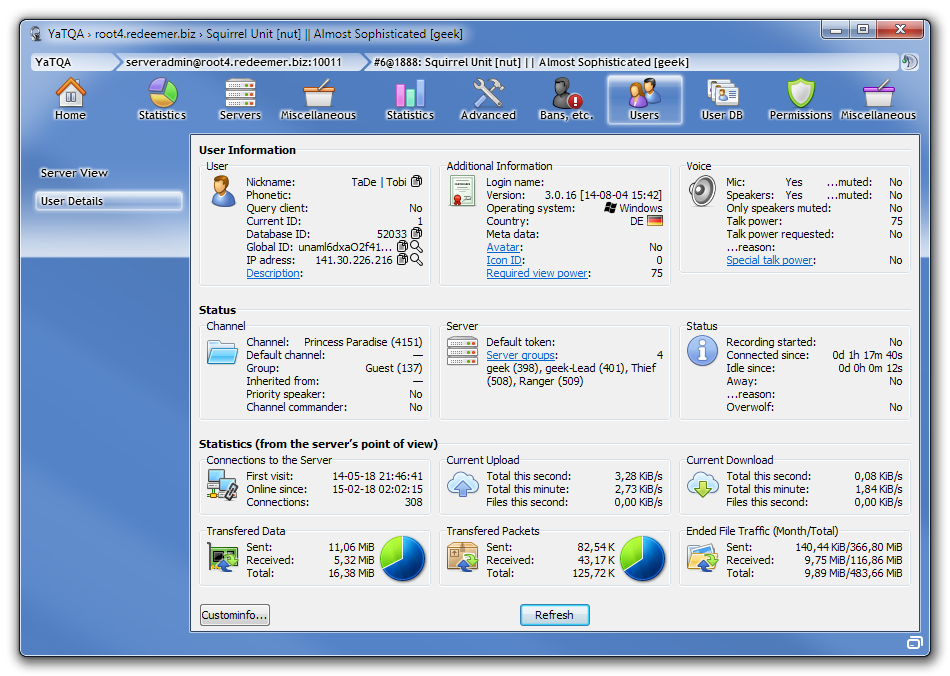
Display all user details. Clicking the Custominfo button shows a window that displays the custominfo of the user in ident=value style.
Channel Details
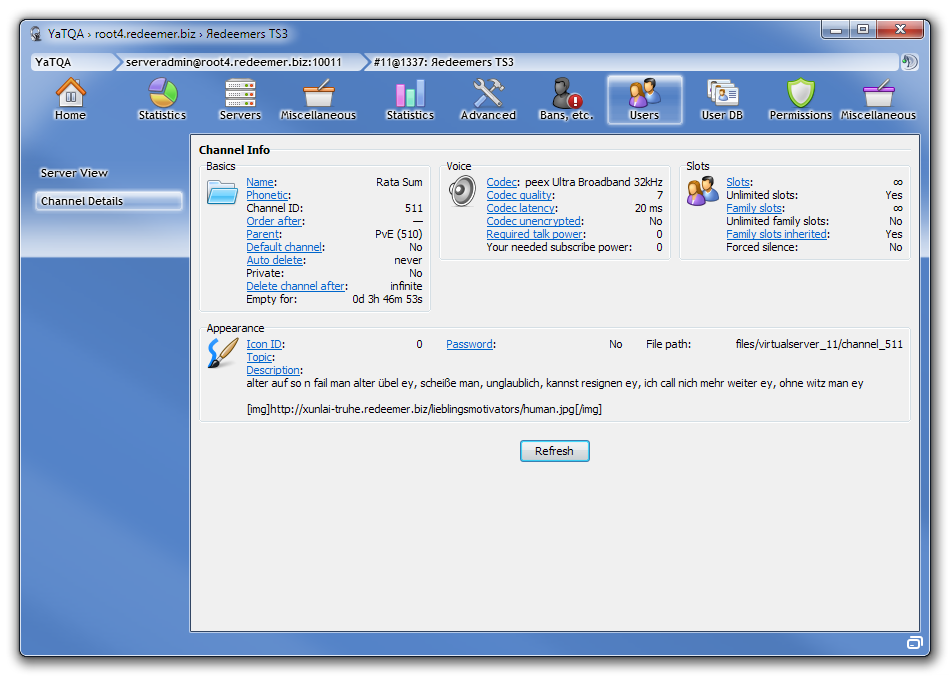
Display and edit all channel details.
User DB
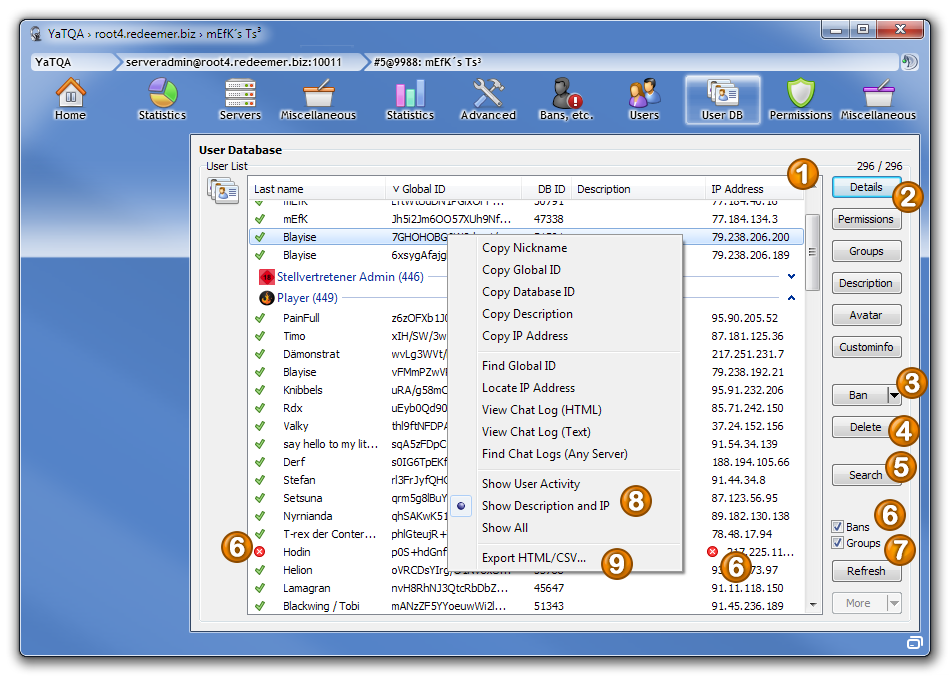
List of all users your server knows. YaTQA downloads 200 profiles at once, while TS only downloads 10. You can search for names, UIDs or custominfo (that’s information attached when using tokens).
- User DB: Lists all users known to the server. It starts with 200 items and can load 200 more by clicking the More button. By holding ⇧ when clicking the More button or using the nearby dropdown menu (Windows Vista or newer), you can load all available users. You can see the progress in the top right.
- Details: Shows all available details your server knows about the users, except for the information handled by the other buttons. Compared to what we have in the list, this is only the file transfer statistics.
- Ban: By default, this bans by UID. You can use the nearby dropdown (Vista and up) to ban by name, IP or CIDR /16 IP. This supports multiselect.
- Delete: Deletes the user and his avatar, tokens and temporary passwords. If you are sure to know all of a user’s identities, deleting all of them is the safest way to make sure a user doesn’t have or get any permissions on your server anymore.
- Search: See chapter below.
- Bans: Shows bans by a red circle with a white cross. It highlights the column causing the ban and displays the total result in the first columns, depicted by a checkmark (if not banned) or the previously-described icon (if banned). Please note that this does not support wildcards in ban targets. Enabling this setting is saved in the settings file until you uncheck it.
- Groups: Groups mode must be enabled after bans (if you want to combine the two) and after all the database entries you want have been loaded.
- View Modes: Because space is limited (in the free version), not all columns are displayed. You can choose which by this feature. As a quick note, users with 0 connections failed to provide the password or are banned before they were even connected (e.g. bad name).
- Export: See chapter below.
Export
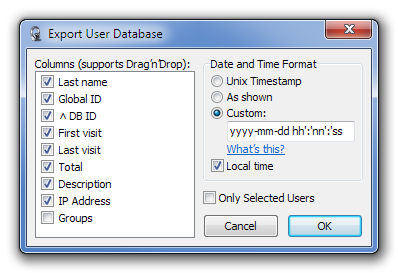
Export the database to CSV or HTML in either UTF-8 or UTF-16LE (you can choose which one before this window is displayed).
This window should be easy to use. Select and drag’n’drop the columns you want and select a date format. Settings are saved until you restart YaTQA.
Note that activating the Groups checkbox requires you to be in Groups Mode.
Client Server Groups
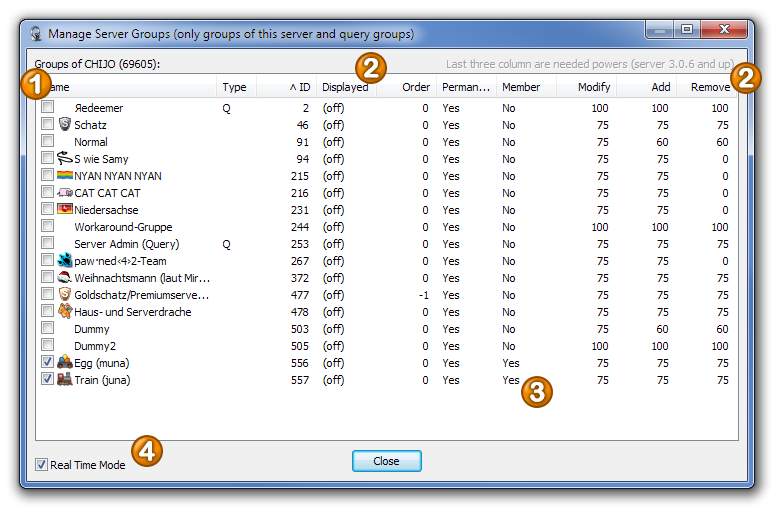
Shows all server groups of a client.
- Checkboxes: Check the groups you want this client to be a member of.
- Some Permissions: Most of the columns display a certain permission set for the group:
- Displayed
i_group_show_name_in_tree- Order
i_group_sort_id- Permanent
b_group_is_permanent- Modify
i_group_needed_modify_power- Add
i_group_needed_member_add_power- Remove
i_group_needed_member_remove_power
- Member: Shows if the user was member of this group before.
- Real Time Mode: If enabled, changes are applied in realtime. This setting is saved.
Search Features
YaTQA offers five different search features here:
- Last Name: Searches a user by their last name. Use % as a wildcard for an unlimited number (including 0) of any type of characters.
- Global ID: Shows if a user with a certain UID has been on the server.
- Database ID: Shows some information about a database ID.
- Custominfo: Searches users by their custominfo. You are first prompted to enter the ident, then the value. The latter can use wildcards and that’s also the default: Showing anything.
- Channel Owner: Finds all users that have a non-standard group in a certain channel. You can also choose to limit this to a certain group after choosing a channel.
If more than 3 users are found that match your criteria, you can choose if all of their info should be queried or not. If you choose not to query all of them, you can always use the Details button on the top right.
Click Refresh to end search mode.
Permissions
Permissions
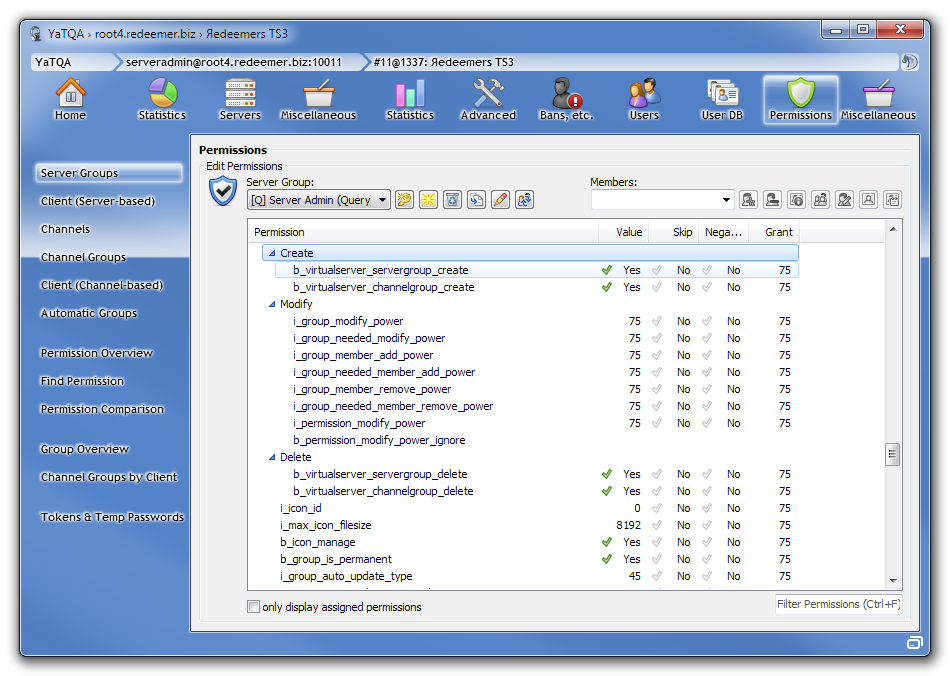
Edit permissions, like the advanced version in the TeamSpeak client. There are some differences, e.g. you can add people just by their name. No need to mess around with numbers.
Import Permission File Screenshot applies to: v3.0-gamma and up
Description applies to: v3.0-gamma and up
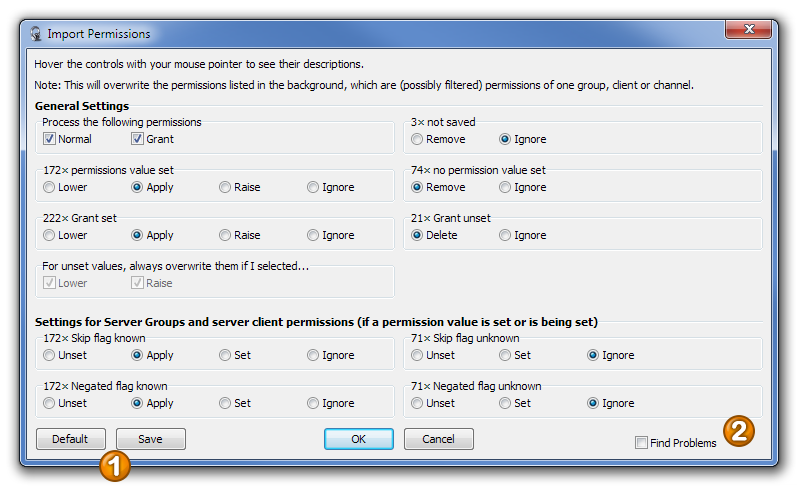
This window is for importing permissions. Also read the two notes at the top of the window!
Also note that the Group Overview subtab will be better if just copying server and channel groups among server and keeping their tier/type (server or channel). That feature also allows you to import/export multiple groups at the same time. The feature described here must however be used when you want to change the tier, e.g. copy a server group's permissions on a client.
- Default/Save: Whenever this window is opened, it loads your current saved settings (or the default settings if there are none). Settings are only saved when clicking Save. Default loads (and saves!) the default settings which will make the permissions in the background an exact copy.
- Find Problems: If setting the permissions fails, TeamSpeak will report a general permission error and not what permission could not be set. Activating this checkbox will set (but not delete!) each permission with its own command, so you can find out what permissions fail. In case of an error, you can choose to stop (OK) or continue (Ignore) with the remaining permissions. If all permissions are set, the permissions that need to be deleted areh being deleted with a single command, no matter if you check this box or not.
Set Multiple Permissions
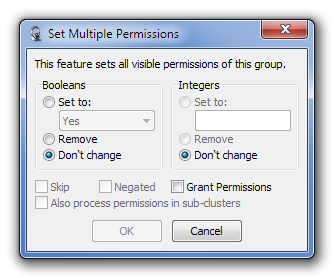
In this window, you can set a value for all booleans and all integers that you previously choose to edit. Checking the Grant Permissions checkbox (if present) results in YaTQA editing these instead of the normal permissions. As they are all integers, you can only enter an integer then.
Automatic Groups
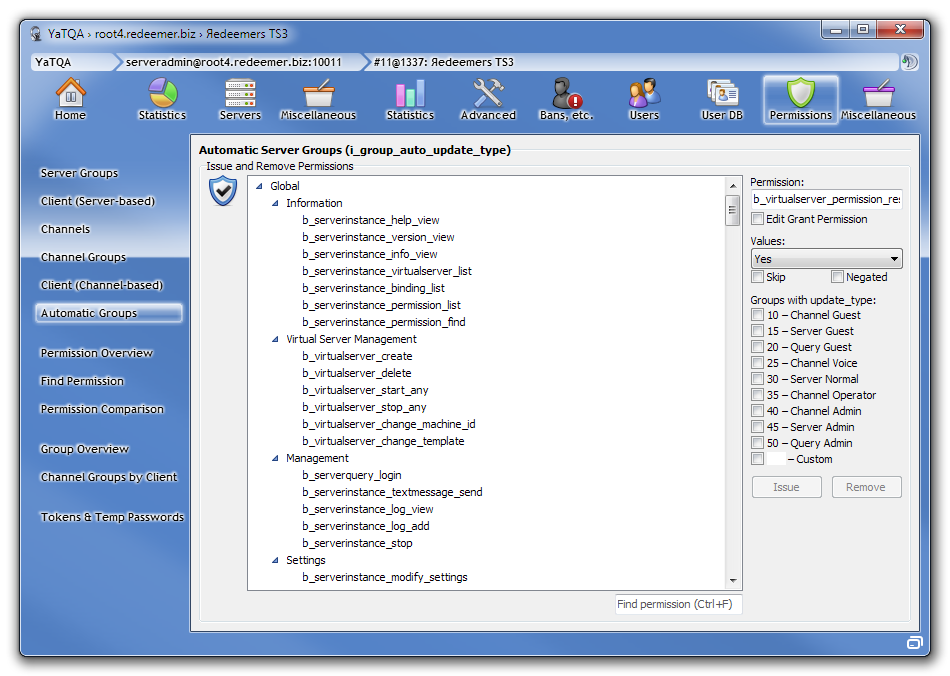
Edit all normal groups with a certain i_group_auto_update_type. Usage is straight-forward: Select a permission, enter (or select) a value and choose which i_group_auto_update_type to update. Please note that no matter what the description of these values says, this feature will be modifying non-query non-template server groups only and will briefly require a spare virtual server on your license if not all servers are currently running.
As an additional note, this feature only requires b_permission_modify_power_ignore. If you have this permission, you can use this feature with all permissions there are, even if assigning them the normal way fails.
Permission Overview
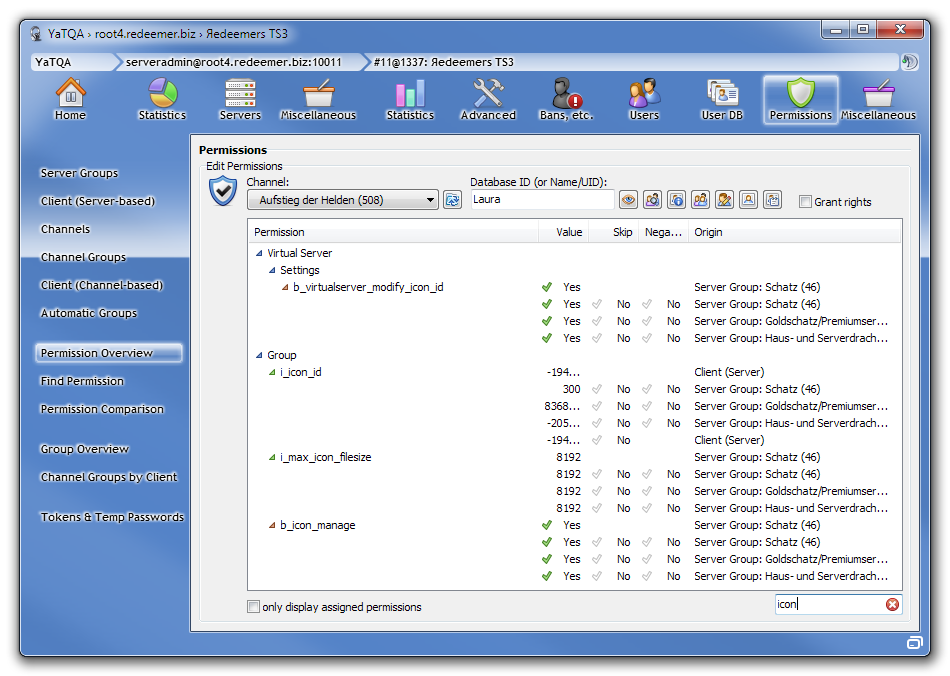
This feature not only looks similar to the normal permission editor, it is also very similar in its usage. Compared to the permission overview feature in TS, this one is way better by the fact that it is grouped by permission instead of permission sources and that you can live-edit all permissions. The calculated total value cannot be edited of course, but is recalculated in realtime. YaTQA also uses a different formula for calculation compared to the TeamSpeak client.
Find Permission
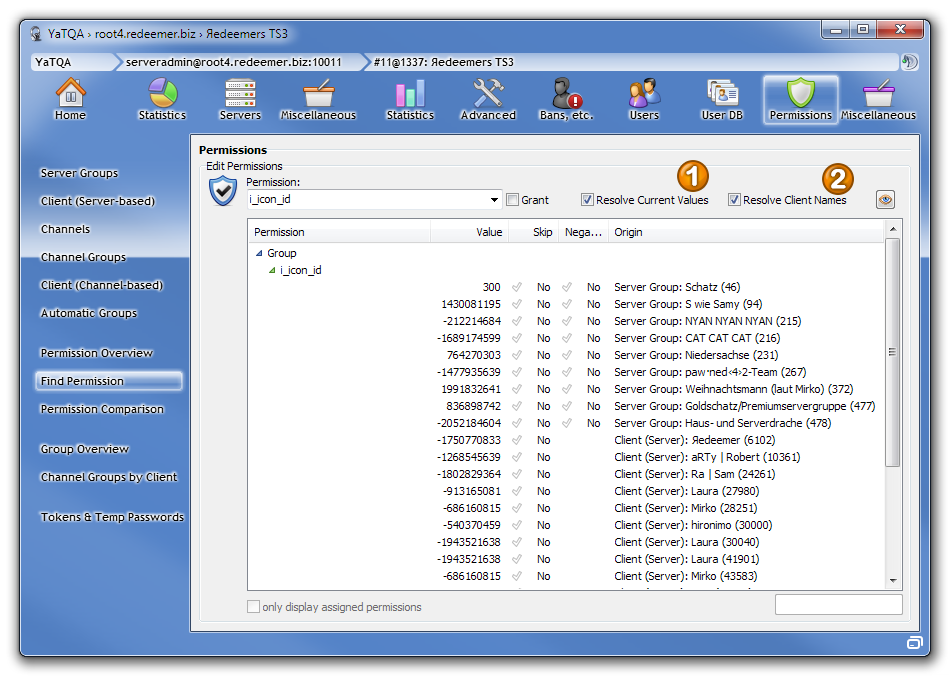
Find out where a permission is being set on your server.
Yet another tab to look similar to the other permissions tab and it actually is. There are two features worth an additional note:
- Resolve Current Values: By default, the underlying query function only returns the sources of a permission. Therefore, YaTQA needs to do a query for each of these sources to retrieve the value. If you don't care what the value is and you just want to edit the permissions, feel free to do that without having this option checked. Without this option checked you can still have YaTQA look up only a certain value if you want to save query commands.
- Resolve Client Names: Everything said about the above feature applies to this one as well.
Permission Comparison Screenshot applies to: v3.0-gamma
Description applies to: v3.0-gamma
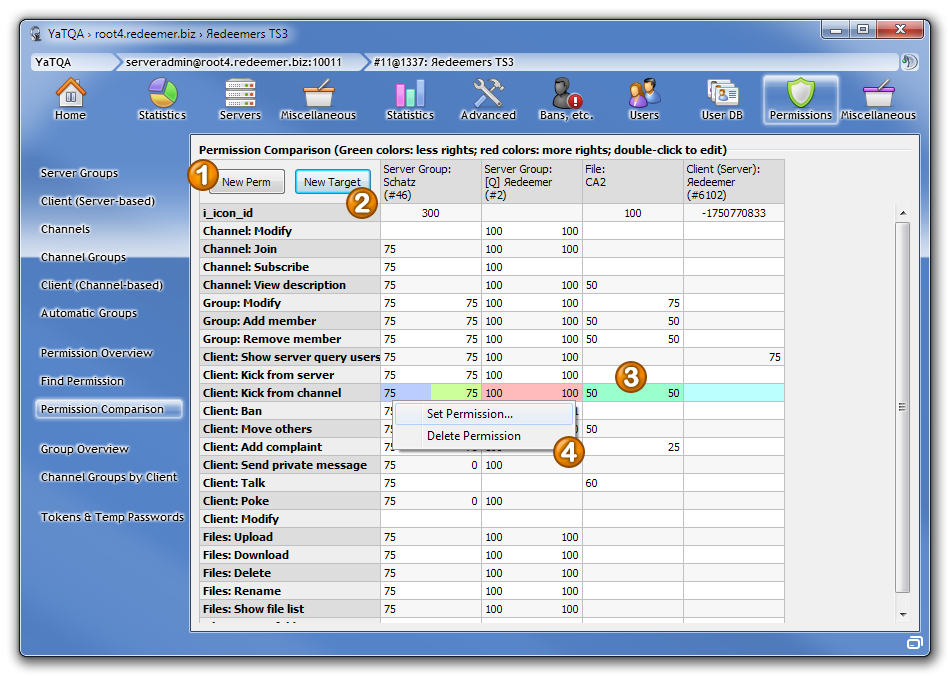
Compare powers and other permissions.
- Add Perm: Adds a permission to the comparison. By default, you can see the so-called
powerpermissions nicely grouped, but you can add your own permissions as well. - Add Target: Adds a permission source. You can not only add the five normal permission tier but also permission overviews (calculated total values) and permission files.
- Colors: When selecting a value, it will turn blue and all other values for the same permission will be compared to it.
- Blue: Your selection
- Blue-green: Lower value
- Yellow-green: Same value
- Red: Higher value
- Pink: No value
- Editing permissions: You can edit all permissions that come form the five permission tiers. That means files and permission overviews cannot be edited.
Group Overview Screenshot applies to: v3.0-gamma5 and up
Description applies to: v3.0-gamma5 and up
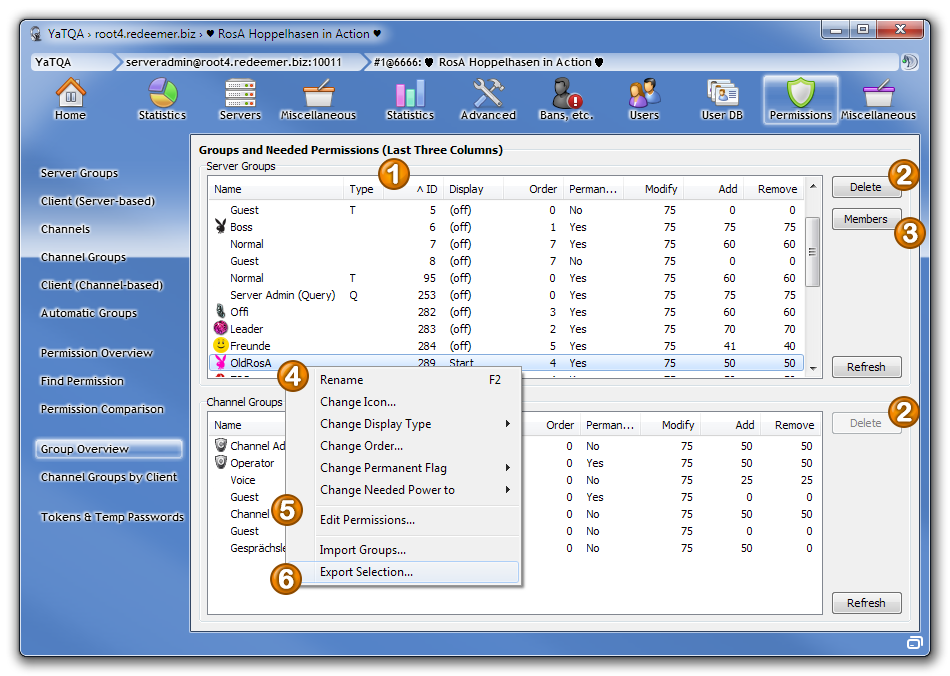
An improved group list with many additional features.
Gives you an overview over your groups and allows modifying multiple groups at once.
- Group lists: There are two lists, one for server and one for channel groups. Context menus only affect the list you right-clicked.
- Delete: Deletes the selected groups.
- Members: Shows server group members. If you want to know the channel groups of a user, go to the Channel Groups by User subtab, for the users in non-channel groups in a certain channel, use the User DB tab's Find feature.
- Modify groups: This allows you to edit the displayed information. All but renaming also work for a selection of multiple groups. If you want to edit other permissions, use the next feature:
- Edit Permissions: Allows you to edit the permissions of all selected groups. This displays the Add Permissions and Set Multiple Permissions windows.
- Import/Export: Allows you to export and multiple groups at the same time.
Server Group Members
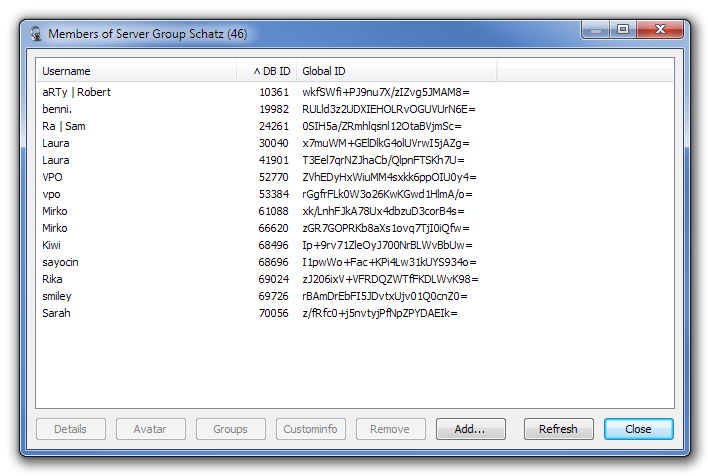
Manage server group membership. If you are looking for the channel group member list – it’s part of the User Database’s search feature.
Channel Groups by Client
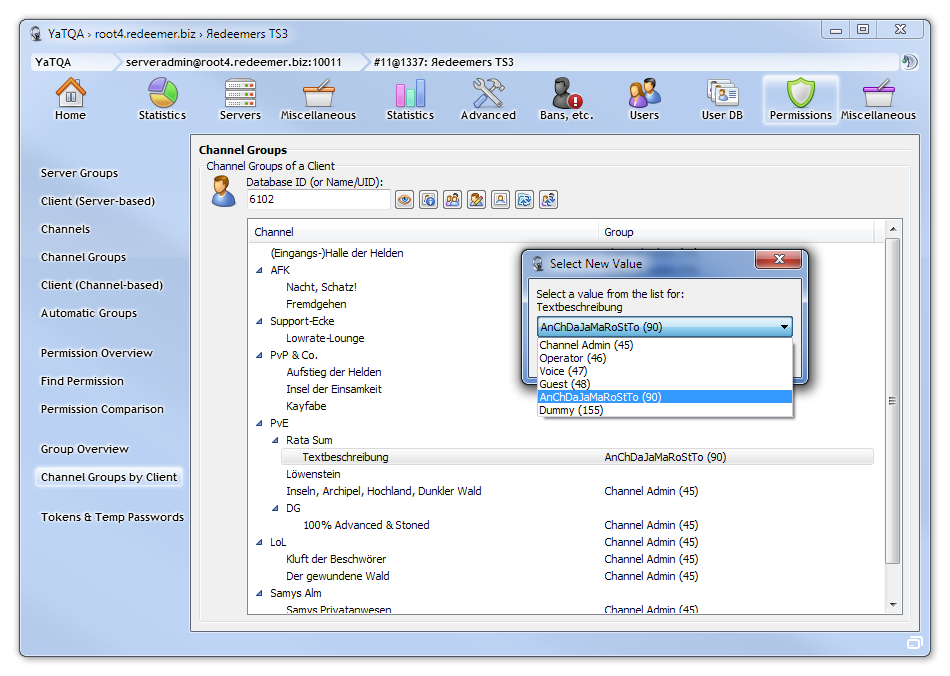
Display all channel groups of a client. Usage is easy: Just enter a client (by UID, ID or nickname), and then you'll see the channel groups on the server. They can be edited by double-clicking any line.
Usage is easy: Just enter a client (by UID, ID or nickname), and then you'll see the channel groups on the server. They can be edited by double-clicking any line. If you have selected multiple channels, you must right-click the list to change them.
You can also use this feature to rename channels.
Tokens & Temp Passwords
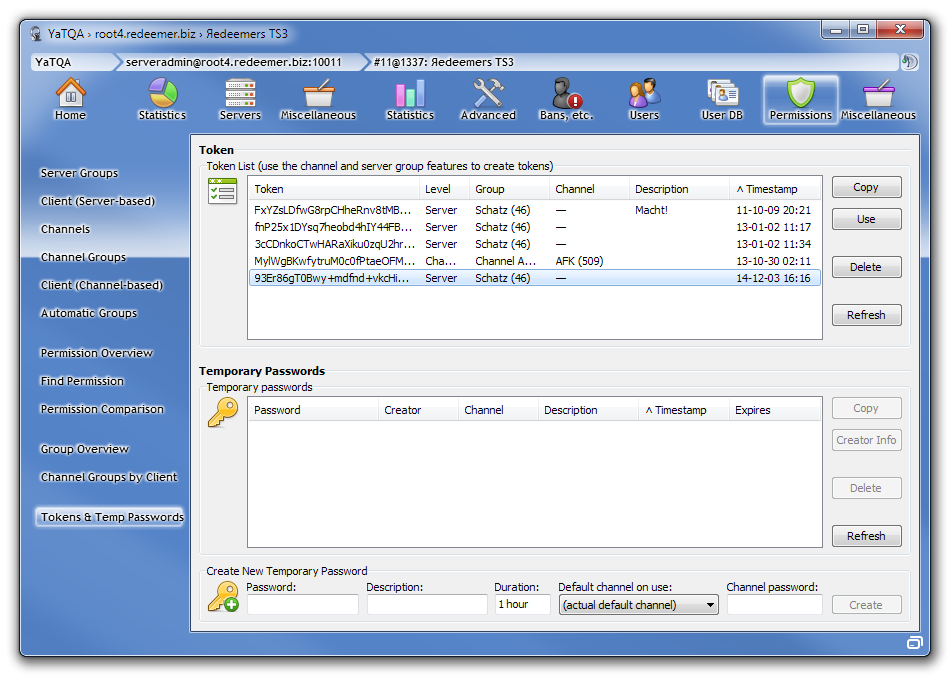
View tokens and temporary passwords and create the latter. Tokens are created in the Server and Channel Groups tabs.
This tab is straight-forward as well. Just one important note: The serveradmin account should not use tokens. YaTQA will warn you about that. The worst thing that can happen is using the default token, resulting in a server bug that will delete the token and leaving no chance to ever get rid of the token prompt on connect.
For the temporary passwords, note that they are not saved and lost if the server is shut down (just like semi-permanent channels).
Miscellaneous
Log Screenshot applies to: v3.0 and up
Description applies to: v3.4b and up
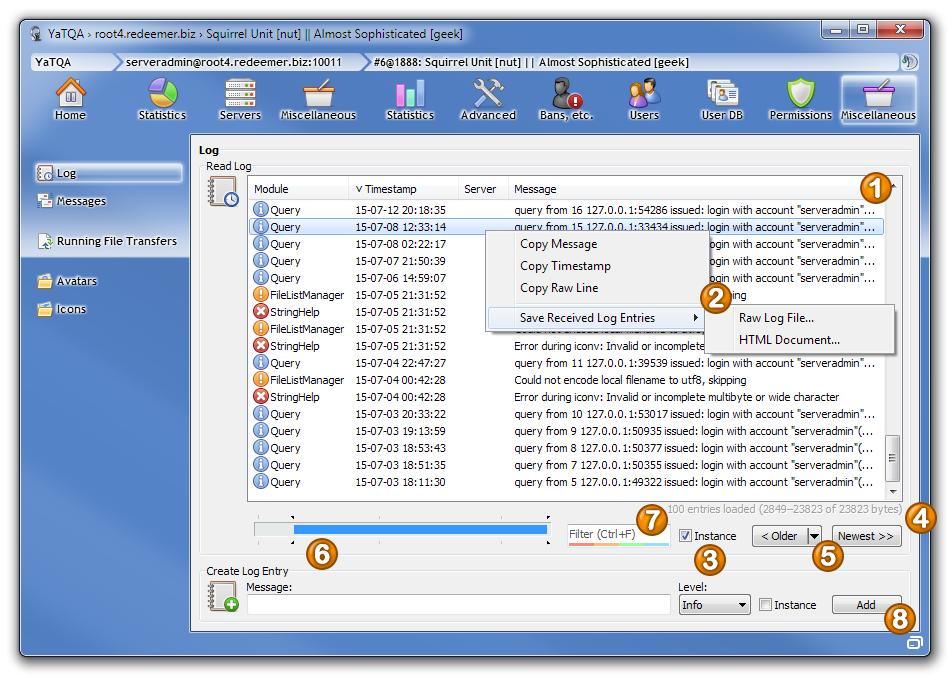
View and add log entries. You can also filter them.
- Log: Displays the log. The icons in front define the log entry’s level (severity): Error (red), Warning (yellow), debug (green), info (blue). The third column is rather pointless because it’s either empty (instance) or your selected server, but that’s what TeamSpeak saves as log...
- Context menu: Rightclick the log for a context menu for that allows exporting the log as either HTML or raw TXT.
- Instance: Switch between instance and virtual server log.
- Position in file: Starting with server version 3.0.1, the log is file-based, meaning that it is accessed via certain bytes. With this change, the number of lines was reduced from 500 to 100, meaning that you only get 100 lines at a time. To load more lines, you have to go back in the file.
- Older/Newest: Going back in the file is done by the Older button. It continues from the oldest entry on. The Newest button loads the newest entries. When loading more entries, the bytes loaded must have no gaps in between. While this is not a problem when going back, this can cause a problem when more than 100 lines have been added before you clicked Newest. In this case, all other lines will be dropped from memory. By holding ⇧ when clicking the Older button or using the nearby dropdown menu (Windows Vista or newer), you can load all available items.
- File diagramm: This diagramm turns the numbers from #3 into something visible by highlighting which part of the log has been downloaded into memory so far. You can click this diagramm with the following results:
- Highlighted area: Same as Older button.
- Area on the left: Drops all lines from memory and loads 99 lines from there on.
- Area on the right: Loads 99 lines from there on. If that would leave a gap to the already-downloaded lines, the latter are dropped from memory.
- Filter: This filters downloaded lines. It does not search in lines that have not yet been downloaded. If you want to search in all lines, download all lines first (see #4). This feature can be used in two ways which can be combined:
- Enter text to filter the lines by the text in the Message column. To filter by the text in the Module columns, it will be best for you to use the sort feature of that column instead.
- Click the colored bars below the text. This hides/shows (from left to right) error, warning, debug and info messages.
- Add Log Entry: Allows you to add a custom log entry to either instance or virtual server log. You can also choose one of the four log levels.
Messages Screenshot applies to: v3.0-gamma to v3.3
Description applies to: v1.3.3.7d and up

Read and send offline messages and send virtual server messages (can also be done in the Users tab).
Running File Transfers

View who’s downloading what at the moment and some seconds ago.
- List of running file transfers: This shows the current file transfers on the selected virtual server. The icons depict the direction from the user's view, so in the above exmaple shows the user downloading (which is me using YaTQA). Semitransparent file transfers are finished, but still returned by TeamSpeak.
- Own file transfers: This box is not specific to this tab but is displayed in the bottom left whenever you are downloading something. It shows your file transfer queue. This is only used by the file browser in the Users tab and the File Backup from the instance Miscellaneous tab. Icon and avatar tabs and the Image Preview are not multi-threaded (so YaTQA will “hang” during the process) as the files are usually rather small.
Avatars Screenshot applies to: v3.0-gamma and up
Description applies to: v3.0-gamma5 and up
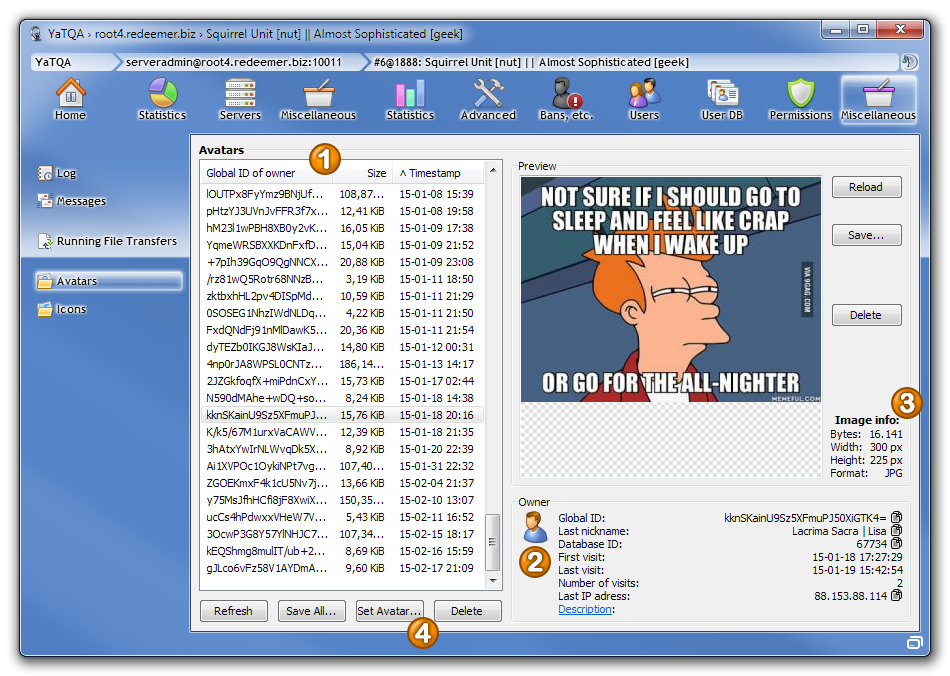
View all avatars on your server and who has which of them. You can also download them.
- Avatar list: This is a list of the avatars on your server. It lists the UIDs because that's the only thing their filename tells. Clicking an avatar will display it, by either downloading it from the server, or – if a matching file name and size is available – load it from your TeamSpeak Client’s cache.
- Owner: This displays the owner of the avatar. By default, you have to click a link to display the owner's information, but there's also an option to do that automatically whenever you select an avatar. In earlier versions of TeamSpeak, avatars weren't deleted when a user's database entry was purged. Those avatars can still not be deleted, even after TeamSpeak introduced a feature to delete avatars.
- Image info: Displays some basic information on the image file. If the avatar has transparency, you can invert the background pattern of the preview by clicking on the preview picture.
- Set Avatar: This feature is for setting your own avatar (the TeamSpeak server software doesn't allow you to set other people's avatars, you can only delete them). This only works if you are not logged in as
serveradminand therefore linked to an actual voice user as only these are permitted to have avatars.
Icons Screenshot applies to: v3.0-gamma and up
Description applies to: v3.1b and up

View all the servers icons, replace them (not a good idea!) or add new ones.
- Icon list: Icons are identified by their CRC32. That's a checksum algorithm also used for checking the integrity of ZIP and PNG files. Only the 5 default icons (and the null icon) are identified by fixed numbers and only these can be used for query groups as they are safe to be present on any server (or, to be more specific, on the client).
- Show All: Initially, all non-default icons are missing. Selecting a list item displays the associated icon and clicking this button displays all icons. YaTQA makes use of your TeamSpeak 3 Client cache. If you have been on the server with your TS3 client and the filenames, file sizes and checksums match, YaTQA will not download the icon but copy it from your TS3 client.
- Preview: Displays a preview on the icon. You can invert the background pattern by clicking on the icon.
- Replace icon: While most other features of this tab are self-explanatory, this needs a warning: Teamspeak uses the CRC32 algorithm for determining each icon's filename. If you replace an icon, it will break both, YaTQA's and the TS3 client's cache. YaTQA will eventually notice a changed file size (if any) and stop using the cache for this icon. The TS3 client will not notice the change until you delete its cached icons. As every user has to delete his cached icons as well, this feature is very risky and should be avoided.
Note: This tab also supports drag and drop from outside.
Collection Screenshot applies to: v2.0-pre and up
Description applies to: v2.0-pre and up
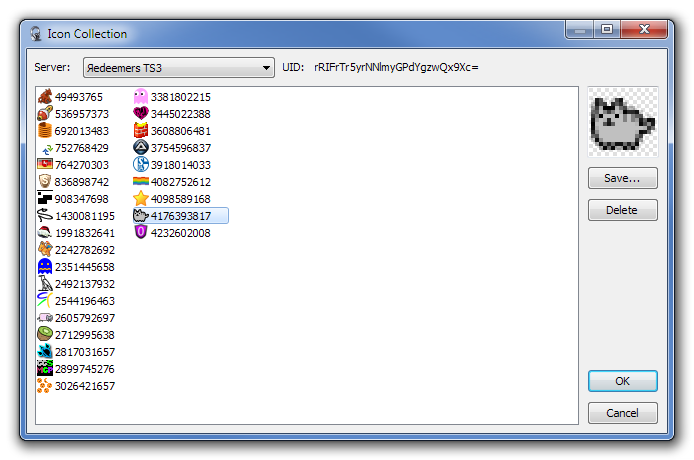
YaTQA automatically collects all icons it has downloaded and allows you to copy those icons to another server. This window is pretty much self-explanatory. It just lists the icons you have collected with YaTQA.
Maybe I will make that cute Pusheen the Cat icon available for download at some point in the future. But that might be a YaTQA Pro feature. ;)